Tips For Improving Your Topology By Neil Blevins Created On: Nov 17th 2025 Updated On: Mar 30th 2026 Software: Any
So what is "Clean Topology"? Or "Good Topology"? Or have you heard the
term "Optimizing your mesh"? When modeling in 3d
software, there are
many modeling methods available to you. But no matter what method you
choose, your goal is not just to create a good looking final model, but
a mesh that performs as well as possible for its intended function.
This tutorial discusses some best practices to achieve good topology
when
3d modeling, and touches on considerations for film, games, and many
other situations.
You have two choices with this lesson, watch the videos below (which
are an older version of this talk), or
read the full text (which is an updated version).
What is Topology?
When creating an object in 3D, there are many ways to represent it. For
example, you could use a formula, like the formula for a sphere is a^2
+ b^2 + c^2 = r^2. But one of the most common ways to represent a 3d
surface in the entertainment industry is as a combination of vertexes,
edges and faces. The configuration of these elements is what is known
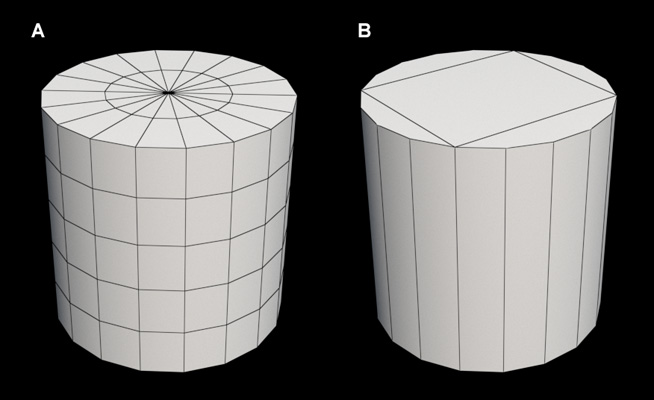
as "Topology". For example, Figure A is some topology that makes up a
3d surface that approximates a cylinder. But B also creates the exact
same 3d shape using a different structure, or different topology. Is
one topology better than others? That's what we're going to discuss.
What is Good Or Clean Topology?
Clean or Good Topology usually means a combination of these 3 things...
A mesh that performs it’s intended function
A mesh that is optimized to work as efficiently as possible in
your renderer
A mesh that is more easily updatable and modifiable
Is There A Difference Between
Clean and Good Topology?
While many, including myself, use the terms somewhat interchangeably,
there is in fact a difference.
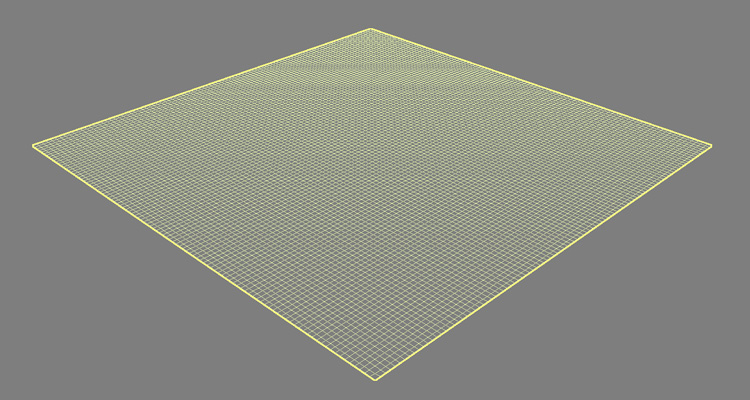
For example, say you have a plane that has interior edges
that are in a grid pattern. Clean means orderly, and a great example of
orderly is a grid with all straight edges. So the 3d model I'm
describing is "Clean". But say the mesh has 1
billion faces, when it's totally flat, and you could get the exact same
results with just a single flat face. That is clean, but it may not be
good, because the more polygons you have, the more computer memory you
are using up, which can cause your render to be slower.
Personally I feel the two concepts are almost inseperable, there's no
point
in being clean if it's not good. And sometimes you
have to sacrifice a little good to get clean, or clean to get
something good (there are many examples upcoming). Which is why I have
the bad habit of using the two terms in a similar way.
6 Tips to Help Achieve Clean
Topology
So lets start with my 6 favorite tips to help you achieve clean or good
topology, then we
will show some examples of why and when to follow these tips.
The 6 tips are:
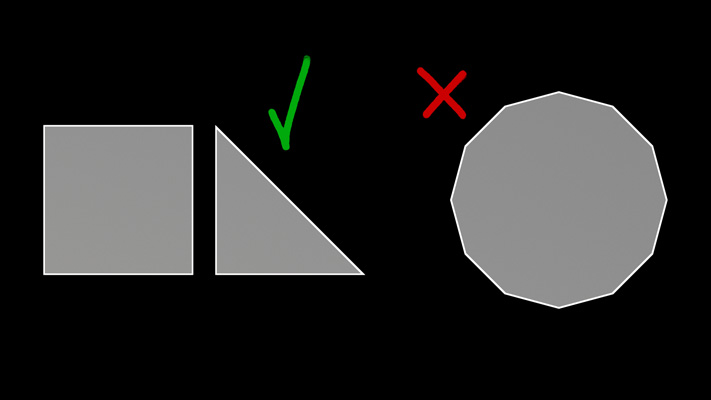
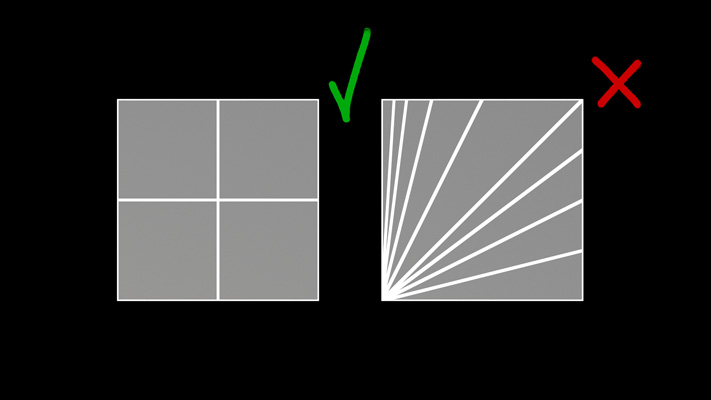
Try and keep your mesh All Quad
or Tri Faces
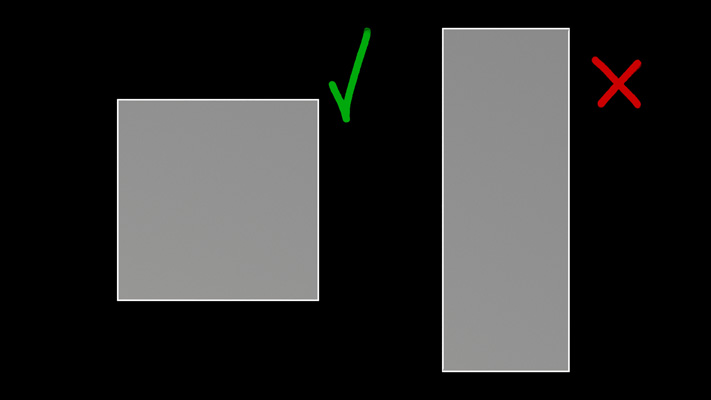
Faces are as Square
as possible.
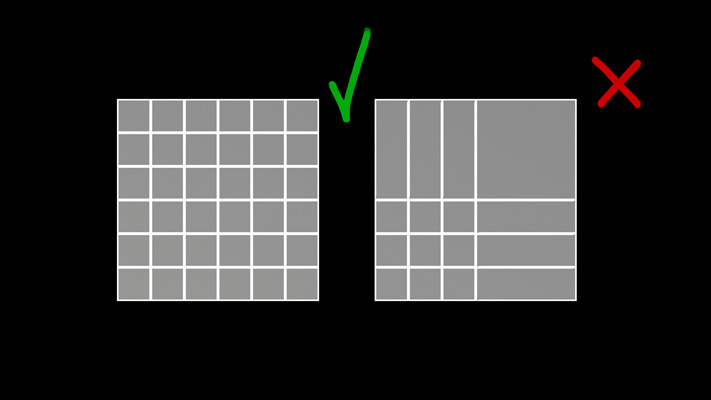
Faces have a Similar Size.
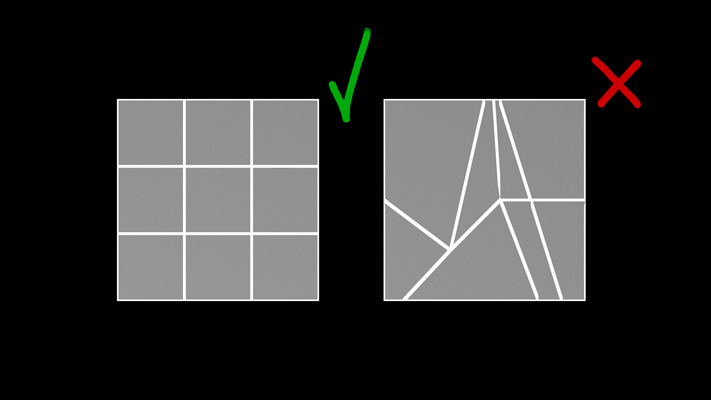
Have the Edge Loops Follow The
Flow of the mesh
Avoid High Valence Vertexes
(vertexes with more than 4 edges).
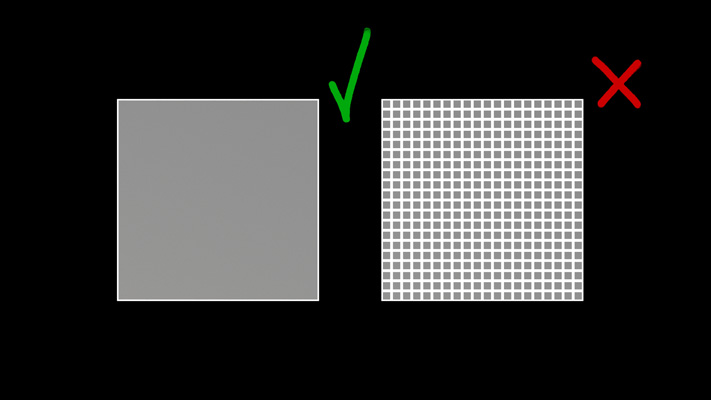
Use as Few Faces As Possible
to achieve the shape.
These Tips Are Not Rules!
I can't stress this enough, these tips are not rules. Clean Topology
can mean different things depending on the situation. There is no one
perfect “Clean Topology” that will work in all situations. And if you
follow all 6 tips to the letter for each mesh, you will NOT achieve
some sort of perfection.
Different topology is needed for:
Films vs Games vs Concept
Hard Surface vs Organic
Deforming vs Non Deforming
Sculpted vs Unsculpted
Prep for Subdivision Surfaces vs Keep as Polygons
etc
So these tips are a process, a checklist of things to consider. It's
all dependent on what your goal for a particular mesh is, sometimes you
may only use 4 of these tips, sometimes you will use all 6, but one
takes priority. Sometimes to achieve clean / good topology you need to
add faces, sometimes you need to remove faces. Deciding which tips to
use when is a
matter of opinion and experience, but I'll try and explore some of
these questions in the following examples. Why Do These Tips
Matter?
So what are the consequences of "bad" topology? Here's a quick overview
of the consequences of not followng one of the tips.
If you have faces that are 5, 6 or n sided (more than 3 or 4
edges), most renderers will convert them into tris at rendertime
automatically. But if you let the renderer do that for you, it might choose a configuration that's less than
optimal. As an example, if I have a 32 sided polygon in my modeling
app, while that might be easier to modify, but when rendered, it might
dice that into a lot of long, thin triangles which can be bad (see tip
2). Also, if your object is deforming, you may get unexpected bad
results when using something other than quads or tris. You
also won't be able to use edge loops as effectively (see tip 4). And
finally, if you're using subdivision surfaces, those algorithms prefer
quads to any other configuration, it will produce the fewest pinch
points.
In general, long thin faces don't work well in
most renderers. It can cause all sorts of rendering issues, especially
texture artifacts, performance problems, stuff like popping textures
from frame to frame, blurry textures at a distance, etc. My game
modeling friends also talked to me about long triangles interfering
with creating automatic LODs. A detailed technical explanation can be
found here: https://fragmentbuffer.com/gpu-performance-for-game-artists/
If you plan on deforming your mesh (like if
it's a character), this process tends to produce the smoothest results
if your face size is nice and even over the surface. If you're not
deforming, this may not be necessary at all.
Having an orderly mesh with good edge flow
makes it easier to use edge loop tools, which are a nice and fast way
to modify your mesh. And if you have a deforming character, it will
produce smoother deformation results.
Vertexes that have more than 4 edges leaving
them can cause artifacts in some renderers, and can potentially render
slower. The more vertexes, the more likely this is to occur.
Scenes with lots of polygons can slow down your rendering
because it increases the amount of data the renderer has to calculate,
process, and store in memory. Especially in games, a big chunk of time
is spent optimizing the performance of the assets, one aspect of which
is keeping polycounts as low as they can be while still performing
their function. This affects film too, but not to the same level
because most films don't have to be playing back in realtime on a GPU.
Examples Part 1
The best way to understand these concepts is to look at some practical
examples. Through them, hopefully you'll see which of these tips to use
and when depending on the situation.
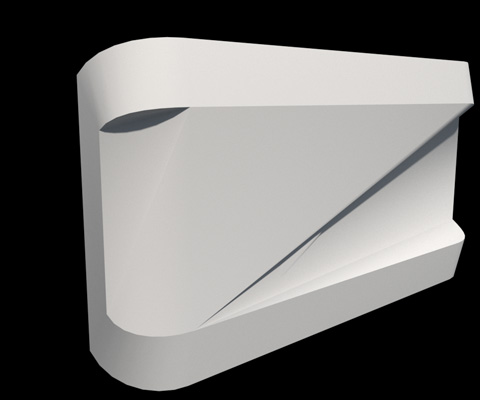
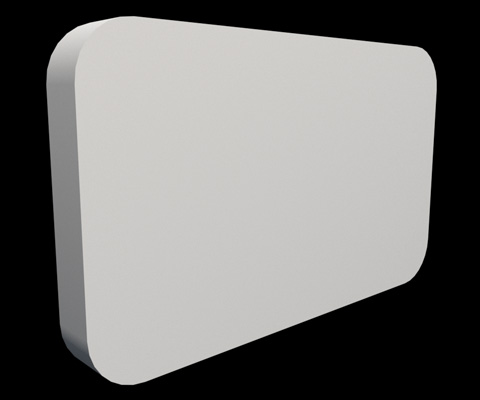
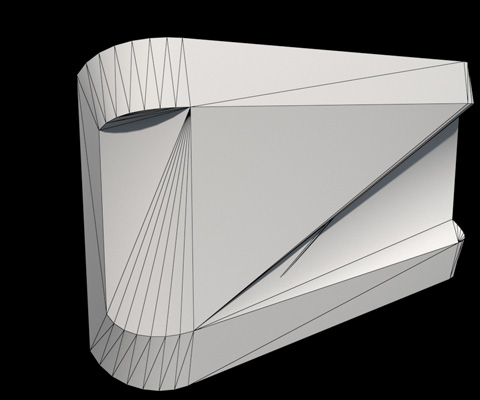
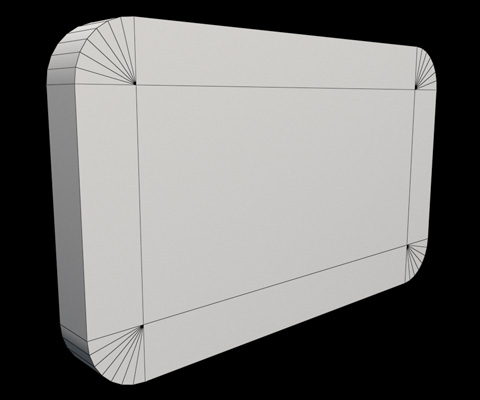
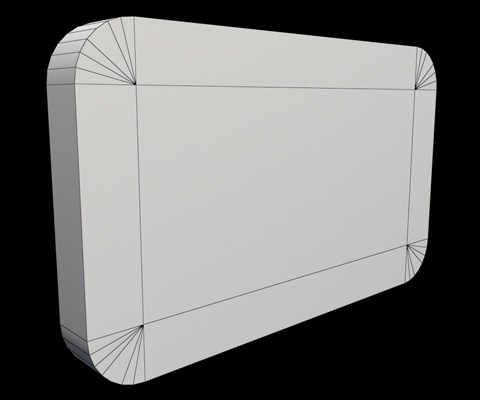
So let's say I have the following mesh, a rectangle
that has beveled edges.
Looks fine when rendered...
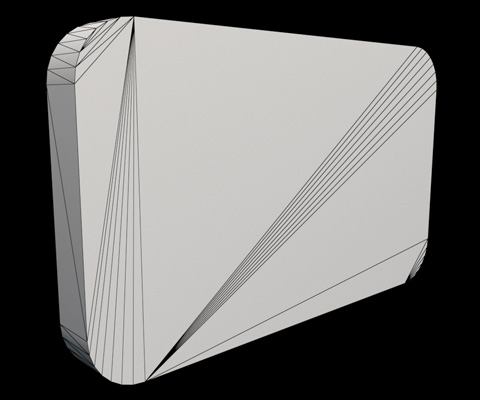
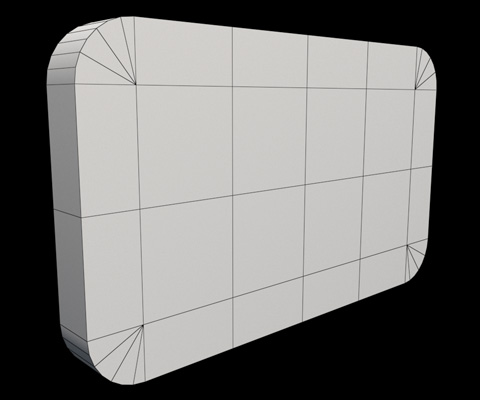
But take a look at the faces that make up the mesh:
Kind of crazy, huh? These sorts of rats nest meshes happen a lot, like
for example, when importing a mesh from CAD software, or the result of
a Boolean operation.
So first question, if the mesh looks fine when rendered, why does it
matter that this mesh doesn't look terribly orderly?
Well, the mesh may be fine as is in some situations. But in other
situations it might be a real pain, and not the right topology for the
job.
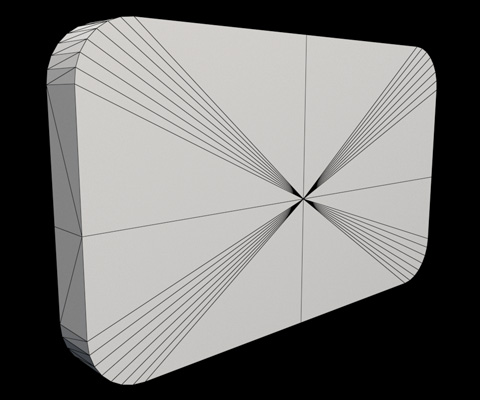
Say that this mesh is a part of a deformable character. Let's do a
simple deformation, something you might expect on a human model, let's
bend the mesh along the X axis. Here's the results, and notice how ugly
they look.
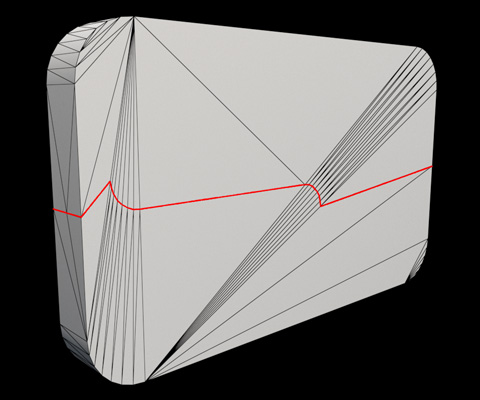
Now what if the director asks you to add more detail to the center of
the mesh? No problem, I'll use an edge loop to split the mesh directly
in half. But wait, my edge loop tool doesn't work very well anymore,
why isn't the loop straight across? (see red edgeloop line).
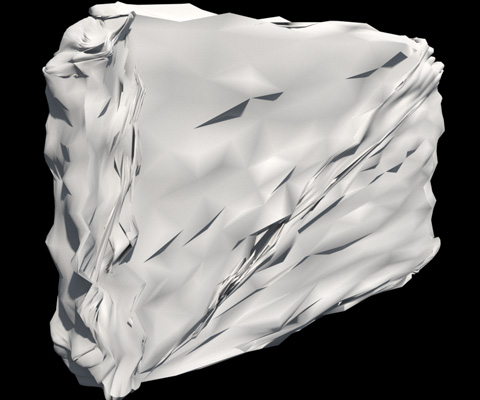
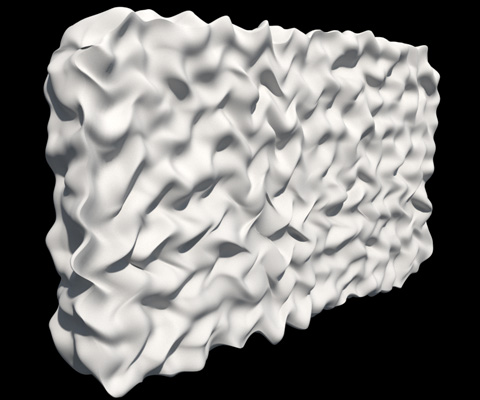
Now what if I want to perform other actions on my mesh, like for
example sculpt the mesh or add a displacement map. Wow, that looks
awful...
As you can see, editing or deforming this mesh in these ways don't work
well due to its topology.
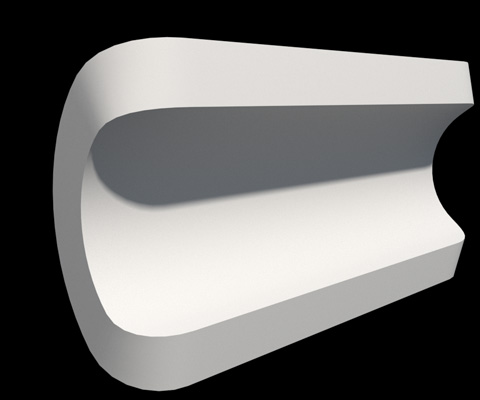
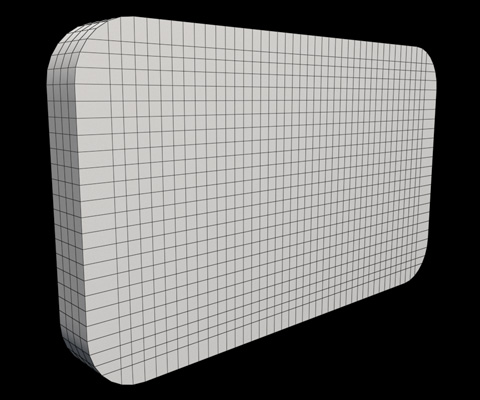
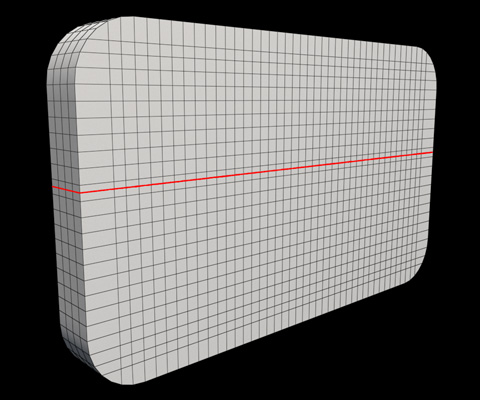
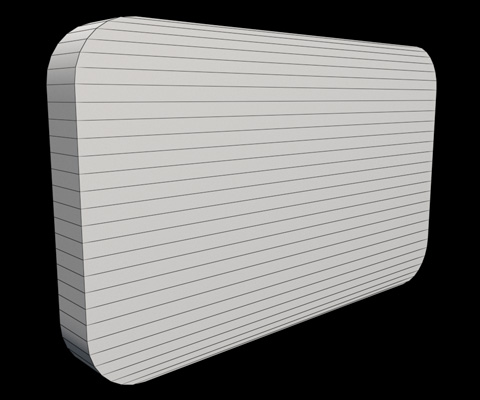
Now lets go about creating a "Cleaner" topology by
carefully editing the mesh based on some of the 6 tips.
Here's some of the things I changed...
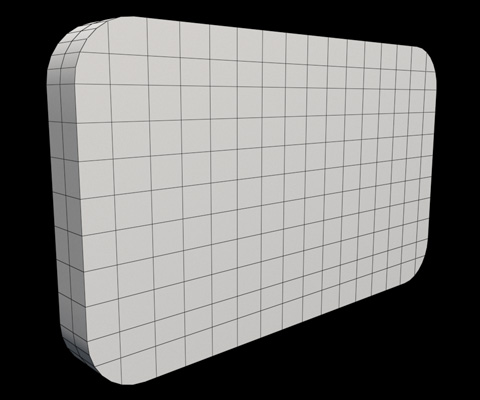
All faces are quads
While not perfect squares, the faces are much more square
While not identical sizes, the faces tend to be pretty close in
size
You now have dozens of edgeloops that properly follow the
direction of the mesh, rather than a bunch of edges that are at an
angle.
The high valance vertexes are now gone
And as you might expect, the results are much improved...
Bending the mesh works fine.
Before
After
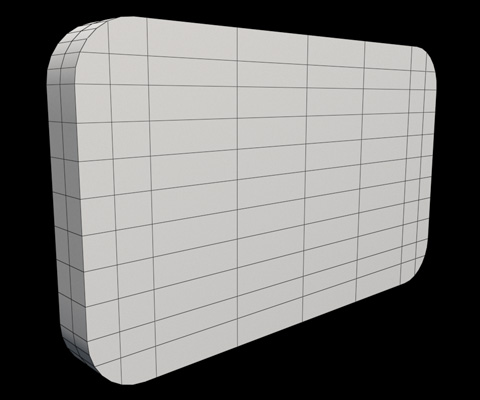
Adding a new edge loop works as expected.
Before
After
Sculpting works far more as expected as well...
Before
After
But this "cleaner" mesh has 2 downsides...
It took longer to create, as I created all that extra geometry by
hand.
It has way more faces. The first mesh had 124 faces. The second
topology has 2500 faces, so almost 20 times more. Why is
that an issue? Because as we discussed, more faces will slow down a
renderer and take
up more memory.
As far as the time it took to create the cleaner topology, there are a
few methods for automatically improving the mesh that take less user
time, for example
Re-Topologizing tools
Quadrilateral Tesselation
Creating very simple base meshes to then add detail using
subdivision surfaces.
These techniques take less work than the manual way of adding edges
and faces by hand. But many times doing the clean up by hand produces
the best results, and gives you the most control.
As far as reducing the number of faces, this can be very renderer
dependent. For example, if your final renderer is an offline renderer
for a feature length animated film, having extra faces may not
be that big a deal. But if your output is a game engine, where you want
60-120 frames rendered per second, then adding all those extra faces
could be real trouble, especially if the mesh appears many times in the
scene. In
which case, you will need to find the right balance between optimizing
the mesh (having as few faces as possible) and having a nice clean mesh.
Examples Part 2
So now that we've seen one example, lets go even deeper into when are
where to consider which tip depending on your goal for the mesh.
1) Lets start with our original mesh, and discuss the tips. So it is
all
Tris. But the faces are different aspect ratios (lots of long thin
triangles). And the faces are all different sizes, some large, some
small. And the edges do not follow the silhouette of the mesh. It has a
bunch of high valance vertexes. The one thing it does have is a low
poly count, it has 64 verts and 124 faces.
2) Now if someone told me that the mesh would never deform (hard
surface),
and do a quick cleanup, I'd probably make a mesh like this. It's all
tris and quads. The faces are not square. The faces are not a similar
size. But it's edge flow is much improved, making it easier to modify
later if necessary. It does have high valence vertexes. And it's still
low poly, 72 verts and 97 faces.
3) Now say someone told me this would be for a film project, I might
edit
it like this. The main changes was I reduced the number of high valance
vertexes by creating a few extra quads, and I added a few extra faces
in the middle. The good part about adding those extra faces was now the
mesh is more even, which will avoid long, thin faces. The bad part is
it adds more geometry, this is 110 verts and 112 faces. But because
this is for film, adding a few extra faces in order to avoid rendering
artifacts is probably fine.
4) Now as some of you know, I have 16 years of film modeling
experience. I
also worked in games, but as a concept artist, so I have never worked
professionally as a game modeler. But I do know many game modelers, so
I asked 2 friends to help out and show me how they would go about
making their topology. The first example is above, and interestingly
it's very similar to the initial cleanup I did, just with one extra
quad. 72 verts, 92 faces.
5) Here's what my second friend did for game modeling. While initially
it
looks different, it's actually pretty similar to what my first friend
did, the chamfered part of the wedge are connected with edges going
towards the center of the mesh. When asked why he added that extra span
down the center of the mesh, he told me it was to reduce the length of
the thin triangle polygons, hence he was following tip 2, important for
both games and films. 74 verts, 144 faces.
6) Up until now, we've been dealing with undeforming meshes. But now
lets
move to deforming meshes, which will likely require higher polygon
counts. Lets say we wanted to bend this along the x axis. Sadly, our
low poly mesh of 72 verts and 97 faces won't cut it, we will need to
connect the two sides of the wedge from left to right, and add more
spans in the middle so it deforms smoothly. This gets us a mesh that
has 120 verts and 119 faces. So we have sacrificed low poly so that we
can deform the mesh. This example would likely be the ideal for both
games and films in this particular situation.
7) Now what if we wanted to deform it along several axes, or sculpt the
mesh for a film projects? That's where we have to bite the bullet and
have a much higher poly count in order to get square and similar sized
polygons that have a nice edgeflow. 2546 verts 2544 faces.
8) Here's what I'd call a compromise mesh. It has a couple of 5 sided
polygons, and the faces aren't square so we could only deform it in the
x axis, but it may do the job depending on the situation, and has only
284 faces instead of 2544.
9) And one final compromise. It has 492 faces instead of 284, but this
one
has enough spans in the middle to be bendable in several axes, not just
one.
Questions To Ask Yourself
So when creating a new mesh or deciding the clean up an existing mesh,
here are some of the more important questions to ask yourself...
What's the final output? A video game, a film, concept art? Will
it matter if my
meshes have a lot of faces?
Will my mesh deform, be sculpted or displaced? Hard Surface vs
organic? Prepared for subdivs or stay as polygons? If your mesh is a
character or the branch of a tree, it may be worth being extra careful
on making a clean mesh. A building in a city? You might be able to get
away with tall faces and fewer quads.
How likely will you need to modify your mesh later on? If
frequently, then a more orderly mesh might be your best bet.
Will your mesh be used with a simulation system like cloth, hair,
water, fire? Some of these systems require special types of topology,
for example, cloth sims work better with tris.
How much time do you have to clean up the mesh to give it proper
topology? Some concept artists give up good topology in order to have
faster iterations. But once they hand off their final mesh to the 3d
team, will the team waste way too much time cleaning up the mess you've
created?
Conclusion
Clean Topology can mean different things depending on the situation.
There is no one perfect “Clean Topology” a mesh can have that will work
in all situations. In the Examples Part 2 section, meshes 2-9 I would
all count as good / clean meshes. To make better meshes, try and
balance
the 6 tips in the way that will match your goals, and the needs of the
project. This about making tradeoffs.
And finally, having the right topology isn't just about cleaning up a
mesh that's already been made, it's about building cleanly as you build
the mesh in the first place. Which means knowing something ahead of
time on how the mesh will be used. But once you do, I feel it's worth a
little extra time at the beginning to do it right. If creating good
topology adds 10% modeling time, but you avoid 100 times the
headache later on, it's likely worth it.