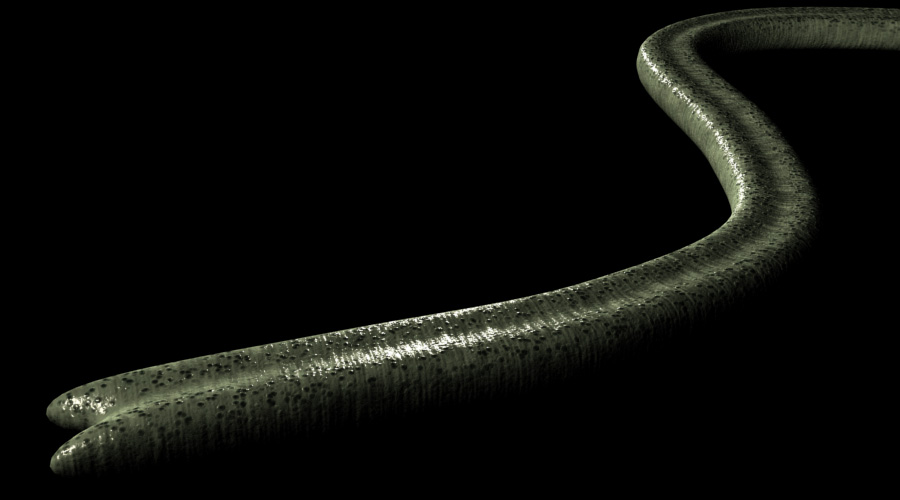
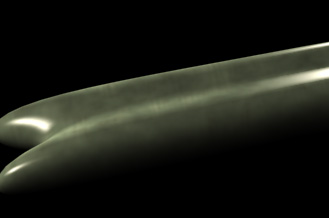
When texturing organic things, you have a number of methods available to you. The two most common methods are procedural textures and bitmaps. Bitmaps are great because you can build a complex texture simply in programs such as photoshop, or even using photographs or combinations of photographs. You also have ultimate control because it's very easy to add specific detail at a specific location. Procedurals are mathematical algorithms that are used to produce patterns. While not as easily controllable as bitmaps, they have some serious advantages such as the fact you don't need mapping coordinates on an object (and hence you'll avoid problems with stretched textures), they also remain detailed even when really close to the object, and they take up less memory then giant detailed bitmaps. However, they also tend to render slightly slower, and they tend to "sparkle" when animated, ie, anitialiasing them can be troublesome. Ideally, a lot of people use both methods, including bitmaps mixed with procedurals. Take the following image...
This shader (Shader is a synonym for what 3dstudio max refers to as a material) is quite similar to a shader I saw on the tongue of a character named Toad from the X-men movie.
Now first, I know what a lot of you are asking, where can I download the example file? Well, although this may make me unpopular, I have decided not to include the example file for this tongue. The reason being that the last time I handed out an example file of a complex material, I got one of two responses. First, a lot of people just used the texture directly in their own work. Second, I got a lot of email from people who said they tried using my example file and could never get it working on their own objects. For those reasons, I have opted for this tutorial to explain in great detail how I went about creating this texture, and the thought that went behind it, in the hopes of inspiring people to make their own textures.
Building In Layers
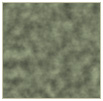
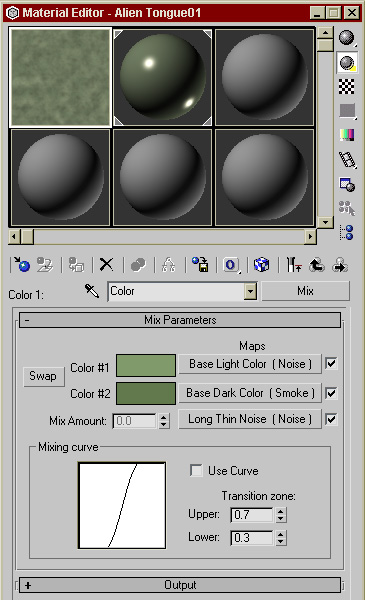
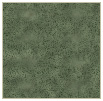
The idea behind any complex texture is you need to build it up in layers. Lets start with the diffuse map for the tongue. I started with a simple noise procedural, set to fractal, and various green colors. Here's a view of the texture in the materials editor...
Note: To see a single layer in the materials editor in a flat 2d perspective, remember to press the Show End Result toggle, that lets you see either the entire shader, or just the part of the shader you're currently working on.
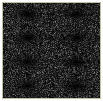
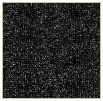
Continuing, I made a second noise pattern, this time using the Smoke map. Overall this is a little darker colored then the previous noise.
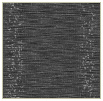
I then mixed these two together by placing the first noise is slot1 of a mix map, and the second noise in slot 2 of the same mix map. In slot 3, I placed another noise, this time I set the z tiling to 13, which makes the noise very long and thin along the z axis.
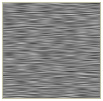
Placing a map in slot3 means that everywhere this map is white we see the noise from slot2, and everywhere this map is black we see the noise from slot1. The result on the tongue is below, notice the soft banding along the circumference of the tongue. When you layer procedurals, the idea is to create detail that is unique, so we have our base coloring, and now some banding on top. Also note, depending on how you create your object, you may have to tile the x, y or z axis to achieve stretching in the direction you want. Just try each till you find the right one.
Here's the diffuse material we currently have...
As stated before, we have some larger color detail, we have some long thin detail, what other kinds of details can we add? How about some tiny detail? To do that, we turn our current mix into a second mix by clicking the button that says mix, choosing mix again, and saying keep previous map as a submap. Slot 1 is now our former mix, slot 2 should be left blank (make the color black), and slot3 is another Smoke, this time with a very small size. That will place the color black overtop of our original material only where the Smoke map is white, creating little tiny blackened details...
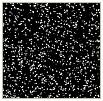
Above is the Smoke, and below the combined material...
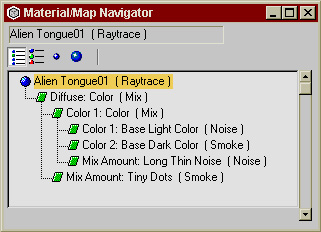
If you open your material / map navigator, you should see something like this. This might be a better way to visualize what you've done, you have a mix that is part of a second mix, hence creating 3 layers, a base noise layer, a darker stripe layer, and now a tiny speckly detail layer.
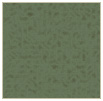
One last color layer to go. Turn your current mix into another mix, say keep previous map as a sub map. Keep slot2 black, and slot3 turn into a cellular map. Make sure you clamp the cellular texture, take the spread value and bring it from 0.5 to 0.1, which makes the map little white dots instead of big white cells.
Now, having this map all over the tongue gets a little boring, remember, in nature, certain patterns appear on certain parts of an organic object, only a few patterns appear uniformly over the entire object. So I decided to apply these black dots (remember, when applied as a mix map, it'll place black everywhere the dots are white, so while the dots of the cellular map are white, the resulting dots will be black) to the top of the tongue only. To do that, I took my tongue (before it was bent into shape) and applied cylindrical mapping to it. Then I made a gradient ramp map that used these mapping coordinates to make two white stripes down the length of the tongue.
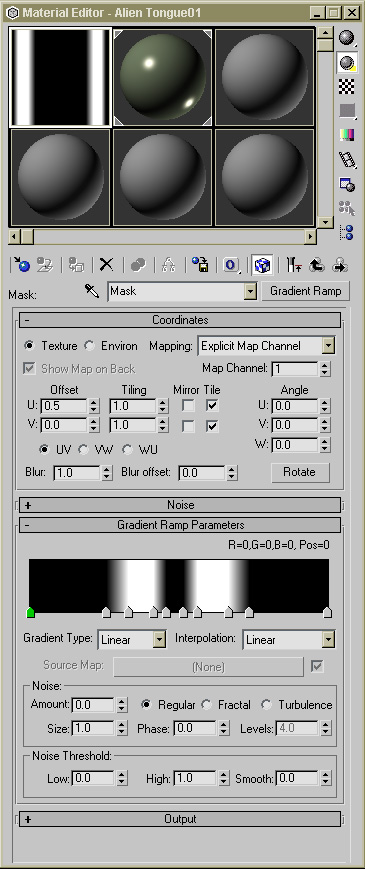
I now take my cellular texture, hit the cellular button, choose mask, and keep sub map. That'll make a mask map, which has slot1 as my cellular, and now place in slot2 my gradient ramp map. That'll place the cellular map only in the white areas of Gradient Ramp.
The combined mask, cellular map and Gradient Ramp map.
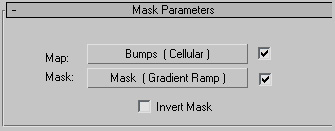
Above, what the mask parameters are.
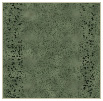
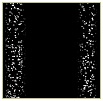
Above, the full diffuse map, the low level noise, the stripes, the small detailed spots, and the larger spots that only occur in two distinct stripes on the top of the tongue.
I build the bump map in a similar fashion. I start with the same long thin noise I used in my diffuse map...
Place it in slot 1 of a mix map. In slot2 I place an instance of my mask
I then change the mix amount to 40%. What this does is mix my general long thin noise with my small dotted noise to form a new map...

That means that everywhere I have little black dots from the diffuse map, those dots will also look like bumps. Remember when making complex materials like this, have a connection between the bump and diffuse maps, make sure there are details that appear in both the diffuse and bump map, it helps make the shader believable, because discoloration and surface texture often happen hand in hand in nature.
Lastly, I change this mix into a second mix, and apply one last layer of Smoke...
To form my final bump...
Remember, BTW, if you want to take any specific layer of bump and make it stronger, say you wanted the small bumps to be more bumped out while retaining the same level of bumpiness in all your other maps, most maps have a spinner in their output rollout called bump amount. Increase or decrease that number to increase or decrease the effect of a specific bump layer.
Now the specular highlight, since I wanted the tongue to look slimy, I needed it to look sorta wet. Wet surfaces are almost perfect reflectors, hence their highlight should be strong and tight with very little falloff. For this material, I chose a specular level of 150 and glossiness of 50 (I used the raytrace material for this example, but you can do similar things in standard if you wish).
One last thing to note, some people notice when applying a noise map to an object's material, when the object deforms (such as using bones, or even something as simple as a bend) the noise does not seem to follow the object. It's as though the noise is staying put in space, and the object is moving through the noise, a phenomenon called "swimming". Obviously, you want your noise to "stick" to your surface, the way you do this is using a simple trick. Apply a second UVWMapping to your object, set it to mapping channel 2, and choose XYZ to UVW. Now, in your material, find every procedural noise, smoke, everything, and go to the source dropdown. Instead of Object XYZ or World XYZ, change it to Explicit map channel, and choose map channel 2. Don't worry if your material editor no longer reflects your material properly, the material on your object should look identical, except now when you deform the object (as long as you deform the object above your UVWMapping in the modifier stack) the texture stays with the faces.
And that's about it, the shader is done. Hopefully this will persuade you to try out layering procedurals. As a side note, I've recently been using DarkTree a lot http://www.darksim.com/ it uses a node based method for layering and modifying procedural textures. In fact, at this point I'm using darktree almost exclusively to do all my maps because of how flexible it is. But the same thought process outlined above works in darktree too, so feel free to experiment. Good luck.