Neutral Lighting Rig In 3dsmax By Neil Blevins Created On: Sept 24th 2013 Updated On: Dec 9th 2024
Software: 3dsmax (vray)
A Neutral Lighting Rig is a light rig where the color of your material
is identical to the color it produces in the final render. So if your
material is 50% grey, its result in your render should be 50% grey as
well. A neutral lighting rig may not produce the best looking images,
but it's a good sanity test to make sure your colors are working
properly, your materials are working properly, and if you test all your
assets for a project with the same rig, you can get a consistent
result. So if you're working with a big team of people shading a lot of
assets, have each asset run in the same neutral lighting rig, and that
way you
can compare the results. Years ago I worked at a company that didn't
have a neutral lighting rig, and each artist made up their own rig, and
the result was when you put two models together in the same lighting,
they didn't match at all, and we have to reshade or retexture a lot of
stuff.
Here's the example rigs below for 3dsmax using the vray renderer,
3dsmax 2022: Neutral_Lighting_Rigs.zip
Or, if you don't use vray, the tutorial should explain enough for you
to build your own using the 3d software and renderer of your choice.
Here's details on the 3 rig setups...
2 area lights and a color skylight (Key, Fill, Kicker)
1 area light and a Image Based Lighting (IBL) skylight (Key, Fill)
skylight only (all IBL)
Also note, this is certainly not the only way to make a neutral
lighting rig, this is just my preferred way and I think it gives the
best results. But feel free to violate any of the rules I give below if
you feel you have a good argument for doing things differently. In some
ways, the most important thing is to use the same lighting rig on all
your assets, the rig itself is more open to interpretation.
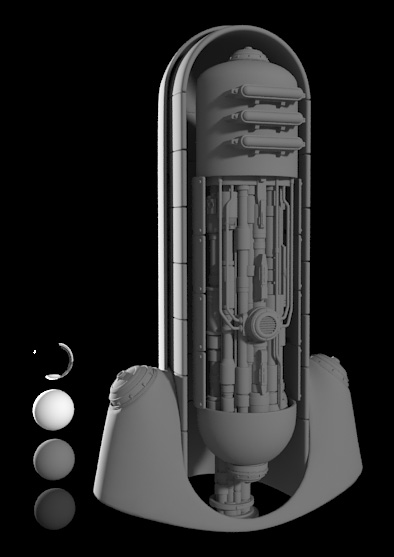
Rig A: 3 Point Lighting
Here's my first rig...
This rig consists of an area light for the key (front upper right), an
area light for the
kicker (behind middle left), and a skylight for the fill (0.2
intensity). So it's a variation of the classic
3 point light setup. GI is turned on with secondary bounces. The robot
head is approx 6 feet tall. The robot is also shaded 50% grey like the
second sphere.
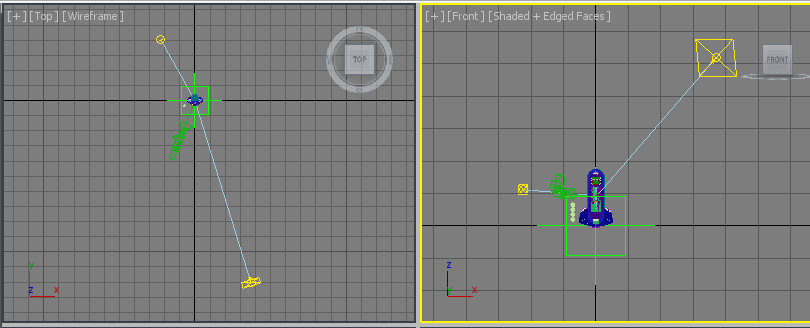
Here's a general idea of the placement of lights...
Notice the 4 spheres in the image. These are my reference spheres. The
first sphere (lowest) has a final color of 25% grey, the second has a
final color of 50% grey, the third is
white,
and the fourth is a fully reflective ball. Since I have no environment
in the scene, the reflective ball appears black with some tiny hints of
the other balls and the robot head in the reflection.
Note, 50% is the
final color after your final gamma correction is applied (this happens
because I'm using Linear Workflow). It's
un-corrected value is 18%. If you're into photography, you may have
heard the term 18% grey card? That's where it comes from, 18% is the
uncorrected value for 50% grey, or middle grey as its sometimes called.
Also note, obviously, not every point on your model is the same color
as the input texture/color, some are darker. Otherwise, there would be
no shading or shadows to your image. For some people, the mid color of
your image should be the neutral color. But for me, I like the
brightest color on your model to be the neutral color. So if you color
pick the brightest parts of the model, those should be the correct
color.
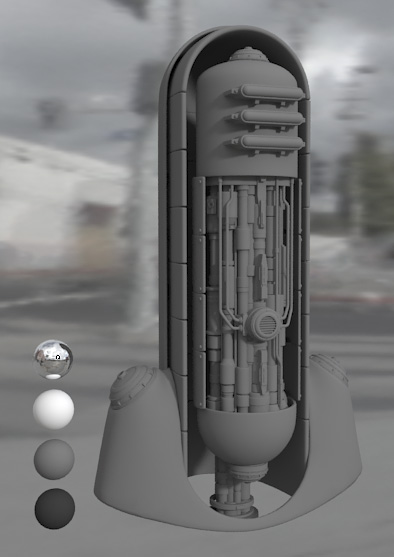
Rig B: IBL and Area Light Sun
The second rig is an IBL (Image Based Lighting) of a street for fill
(skylight), and then a area light for the "sun".
While the skylight isn't 100% neutral (since the hdr has some color to
it), I desaturated it a lot, so it's almost neutral light. Feel free to
desaturate it all the way if you'd like.
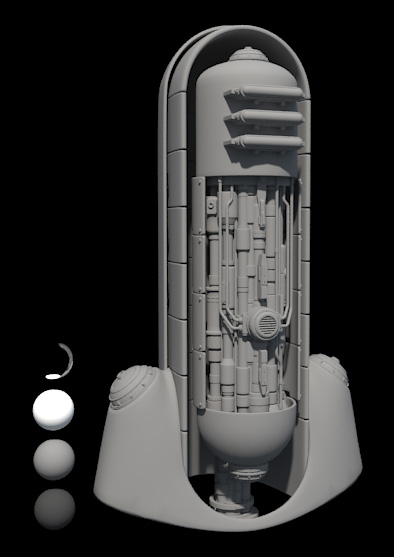
Rig C: All IBL
This rig is all IBL, and the sun is part of the hdr image, instead of
being a separate movable area light. Provides obviously blurrier
shadows since it's all diffused light.
Feel free to replace these IBLs with hdr images of your own. Just
remember to increase or decrease their brightness so you get neutral
color and true value. Also, if your IBL has a sun or another super
bright spot, make
sure to align it so its facing the front of your model. The max files
have a camera specifically so you can place the sun in the right spot.
Pretty Rig
As I mentioned before, these rigs don't produce "pretty" results, but
the results are consistent. But feel free to modify the rigs to make
prettier rigs that show off your model when you want to impress the
client. But also check your model in these boring rigs to confirm that
your colors and materials react as expected.
Here's an example, I tinted the sky blue, the sun yellow, made the sun
higher to get deeper shadows, and made the sun brighter to blow stuff
out a bit.
Reflectance of Human Skin
Also note that when choosing colors for your objects, Caucasian skin is
thought to be somewhere in the range of 30-35% grey in uncorrected
value
(58% after gamma correction), so its
brightness should be somewhere just a little brighter than the 2nd
lowest sphere in any of these neutral lighting rigs. That info may help
you
calibrate your material colors. In general, the colors of real world
objects are a lot darker than you may first guess. It's the
lighting that's brighter than you may expect which leads to your final
bright values.
Alex McLeod also gave me this tip on the subject. While skin color
varies with race, eye whiteness doesn't. So another good test is that
the white of the eyes tend to be about 50% grey in uncorrected value
(73% after gamma correction). So that's about halfway between the 2nd
and 3rd sphere. From there you can also calibrate the skin color
depending on if the eyes seem too bright or too dark for your skin
color. Thanks Alex!