Tips For Modeling Better Trees By Neil Blevins Created On: May 3rd 2020 Updated On: Jan 30th 2025 Software: Any
Modeling trees can be quite a difficult task, and while there's
software out there to help you do it faster like speed tree, sometimes
the tree you're making is so unique or needs to be so detailed that
there's really no good automated way to do it, you just have to model
by hand! In these cases, here's a few tips I've found helpful to not
only speed up the process, but produce trees with real character, so
they don't look malformed or too simple.
A big thanks to all my tree modeling partners in crime: Gaston, Greg,
Nancy, Matt, and others for discovering and helping to develop these
tips. For this lesson, I'll be using 3dsmax for modeling, but I also
make a number of notes about maya, and the overall idea will work in
any 3d app you choose.
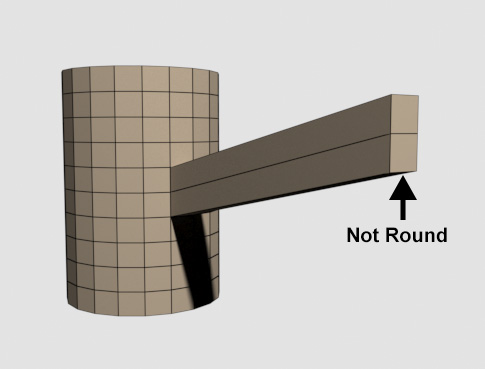
1) Use Splines Or Curves, Don't
Extrude Faces
There are two basic techniques for making branches by
hand. One is to extrude faces on your trunk to create the branch. The
second is to make the branch separate from the trunk, and then attach
them
together.
I favor the second technique. And the main reason is because with the
extrude faces technique, it is really easy to accidentally produce
flattened
branches (branches that have a flattened cross section).
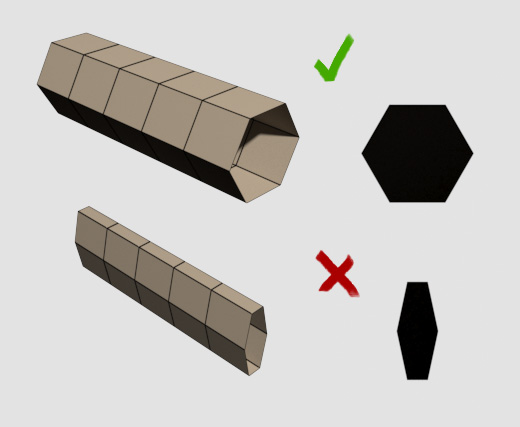
What you want is a nice round cross section to your branches.
Much better to use something like cylinders (have them interpenetrate
the geometry of the trunk at first), to guarantee the branch's
roundness.
Cylinders are fine for a straight branch, but for a curved branch, you
can also use splines (3dsmax) or curves
(maya).
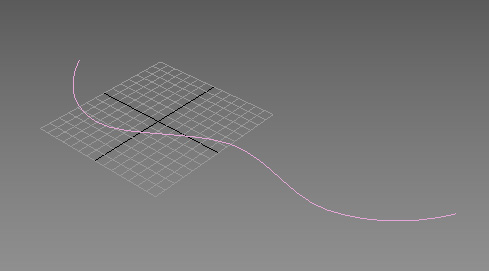
In Maya, create any sort of curve you want to define the branch, then
use the extrude function to extrude a cylinder along the curve. Make
sure the extrude has enough divisions so that the cylinder accurately
follows the curve.
In 3dsmax, a renderable spline (A) will always keep the cross
section round, even when you're pushing and pulling the shape of the
branch around (ie, moving the knots of the spline). You can taper the
branch after you have its main shape using an EditPoly modifier.
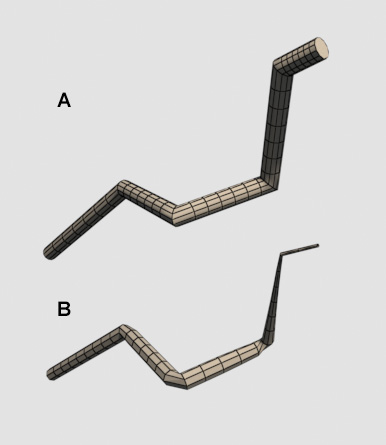
A variation on the
technique is to use the 3dsmax plugin Splinemesher
by Grant Adam, which will allow you to taper the branches
procedurally (B). It's like a taper that automatically follows the
twisty branch.
2) Don't Attach Anything Until The Tree Looks Good
So when you use the technique where the branches aren't
actually attached to the trunk, or each other, you will eventually need
to attach them to form a single smoothable mesh. But wait as long as
possible before completing this step. This is because, once the branch
is attached, it becomes way harder to move and modify, especially if
you're trying
to keep that nice round cross section we talked about. So be really
sure that the tree is awesome (and all of the steps below
have been considered) before starting to attach all the branches
together.
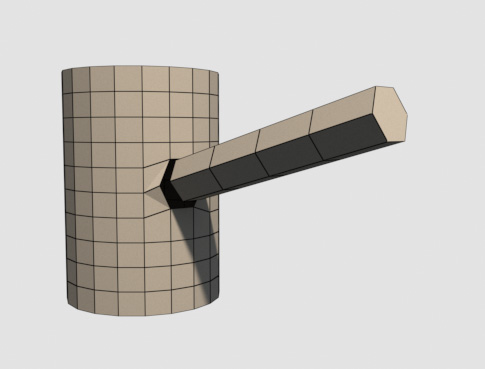
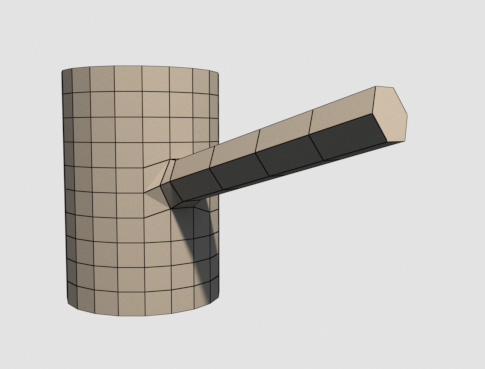
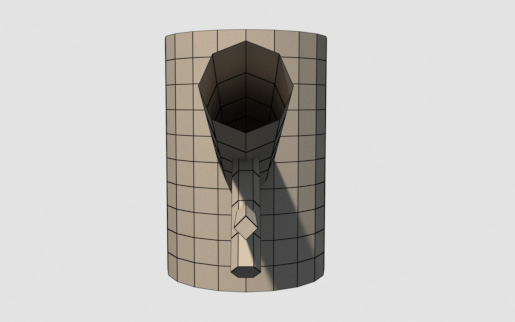
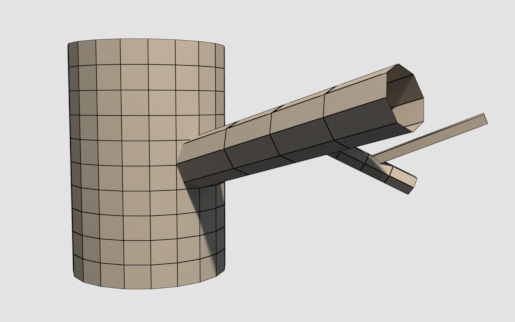
Here's the penetrating branch.
The branch is 6 sided, so I delete two faces on the trunk to create a 6
sided hole, and then I delete the part of the branch that intersects
with the tree.
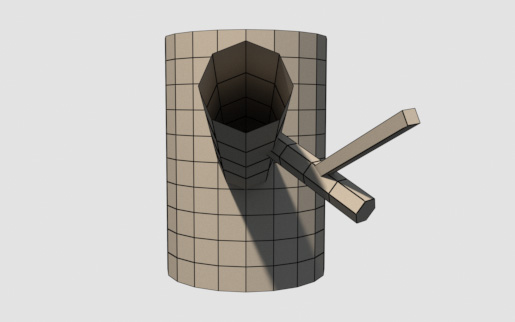
In maya you can join the two pieces of geometry together, then build
the faces to connect the two holes together.
In
3dsmax, attach the branch to the trunk with the attach
function. Then select the perimeter of the hole in the branch, and the
perimeter of the hole in the trunk, and click on bridge in Editable
Poly, which will
connect the two.
And here's the smoothed mesh after I apply a turbosmooth in 3dsmax.
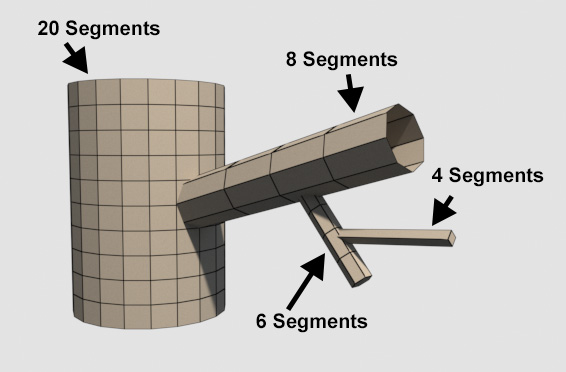
3) Different Number Of Segments
for Trunk, Branches, and Small Branches
As you move from working on the trunk, to the major
branches, to the tiny branches, use fewer segments on your splines or
cylinders as you progress down. Not only will that make sure that
you're not adding too much detail on the tiny branches, but it will
also make it easier to attach the branches to each other, since each
stage will have holes with fewer edges. One rule of thumb may be
Primary Branches: 8-10 segments, Secondary Branches: 6 segments,
Tertiary Branches: 4 segments. These are just suggestions, come up with
your own favorite numbers that generally follow the pattern.
4) Make Sure The Tree Looks Good
From At Least 4 Angles
If you've ever tried to draw a tree on paper, one big
issue is a
tree is a very complex 3 dimensional shape. So translating that into a
2d medium, a piece of paper, is difficult. Turns our replicating
branches in a 3d medium such as 3dsmax or maya isn't super easy either,
since you're building in 3d, but you're using a 2d representation of a
3d world (your flat computer screen).
You may have a branch structure that looks great from one angle...
But rotate the view, and oops, all of those branches sit on a single
plane, instead of pointing out truly in 3d.
The result is a very boring and unnatural tree. So when you're making
branch clumps, make sure that you look at them from many angles, and
that it looks good from many angles.
I tend to make sure the tree looks good from the front, left,
right, back, and four 45 degree angles too.
As well as making a better
single tree that looks good if you travel around it, you can get 4-8
good looking trees from that single
tree just by rotating it, which means you have to build fewer trees to
populate a forest. No one will know its a single tree just rotated
around!
5) Twists
Instead of just having trunks and branches go straight,
consider adding a slight twist to them. This is a really nice detail
that gives a beautiful flow to your trees and branches. This twist is
pretty extreme, but even a very subtle one can add a nice feel.
Either
twist by hand, or in maya, use a twist deformer, or 3dsmax, a twist
modifier on the trunk and
branches before you attach them.
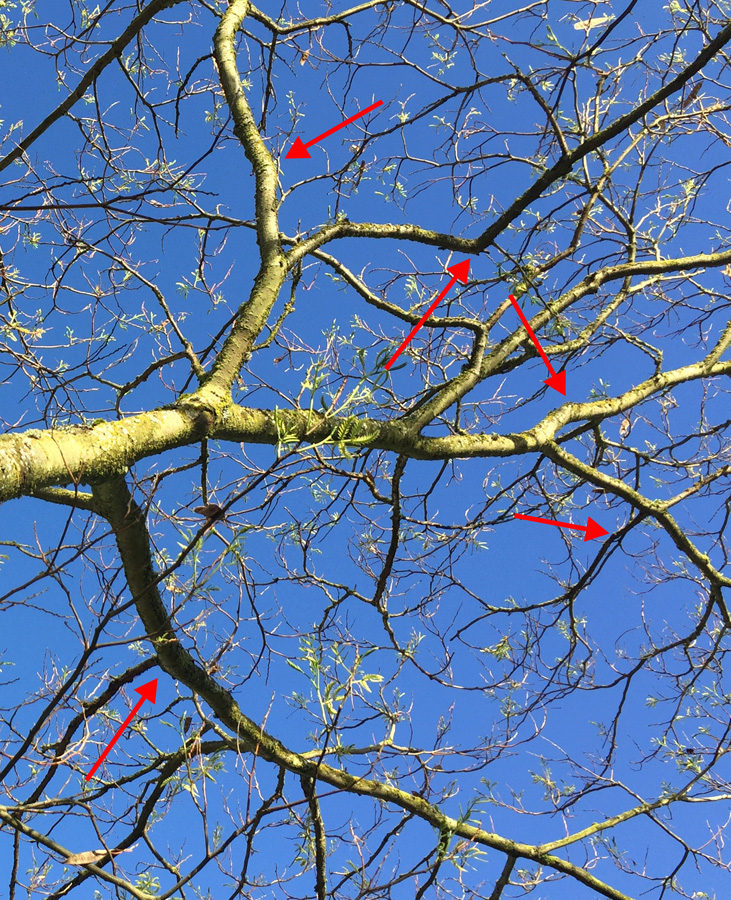
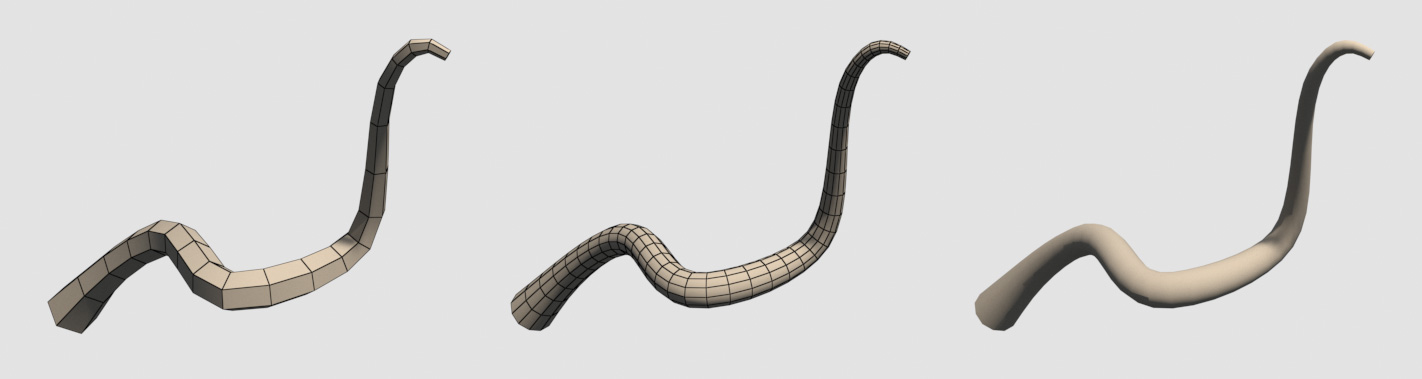
6) Add Irregularity
(and Elbows) Ok, now that I've spent so much time telling you to make
sure the cross sections are circular, I'm gonna tell you the opposite.
The key is you don't necessarily want all the cross sections to be
round everywhere, but start with everything being round, then CHOOSE
where to add irregularity.
So in a few key spots, after you're pretty
sure you want the branch in the spot it is, collapse it (3dsmax) or
delete history (maya) and play around
with some of the vertexes to start creating some flatter areas to avoid
everything looking super round. These areas frequently happen where
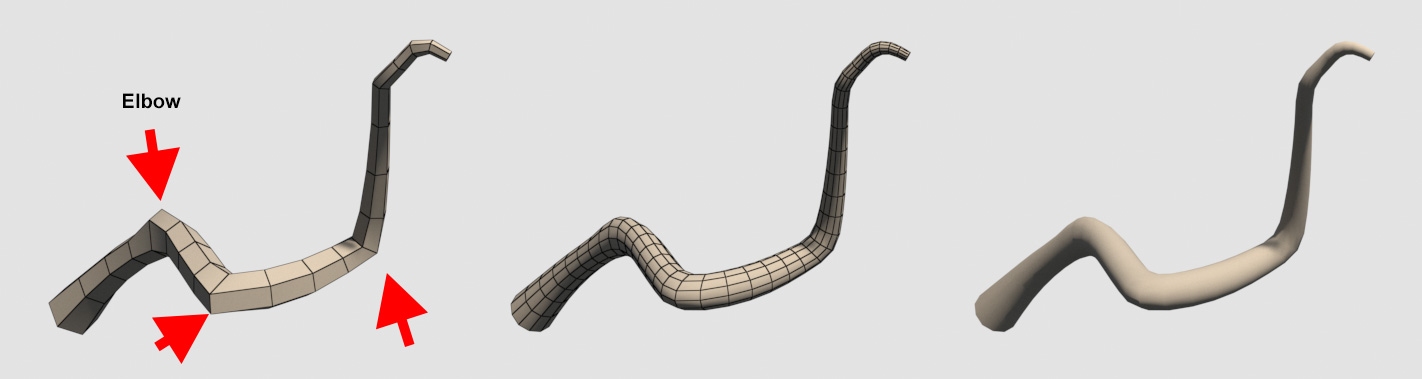
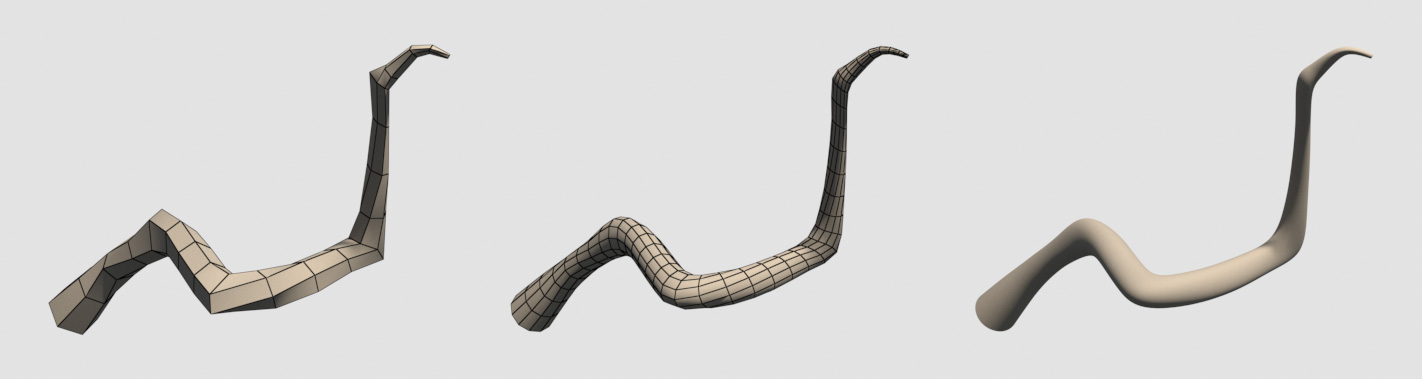
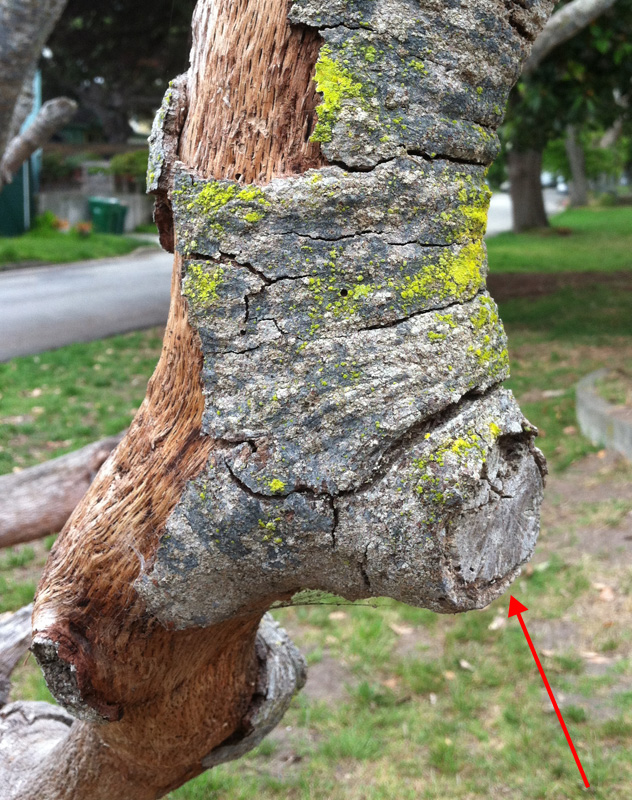
there's a change in the direction of the branch. I call them elbows.
Here's some examples of elbows on a real tree...
Here's an example of a branch that's perfectly round everywhere. It's
boring...
Now take spots where the branch changes direction and push and pull
some of the verts to create elbow shapes (look at your own elbow for
reference). Here's the results...
Far more interesting looking. You can even go a step further and
flatten a few areas ever so slightly, and mix that with some twist to
get some more complex shapes.
If you want to push it even further, the "elbow" spots I've been
talking about are frequently caused by a branch falling off (or cut),
so these
elbows are a perfect spot for placing branch nubs (either in modeling
or in texture).
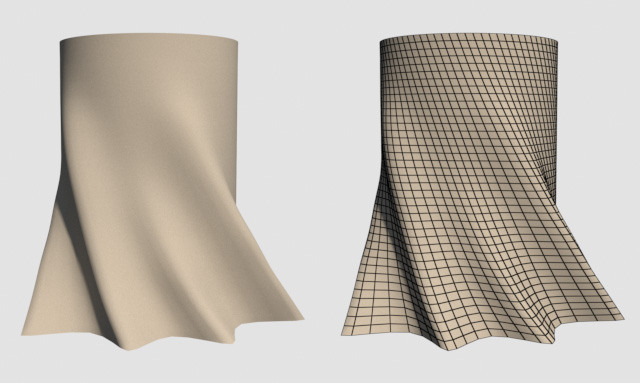
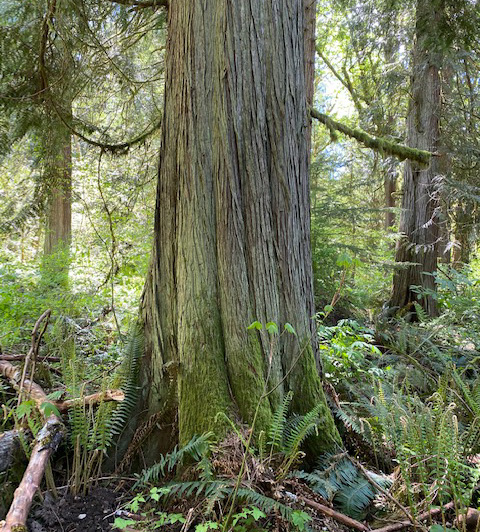
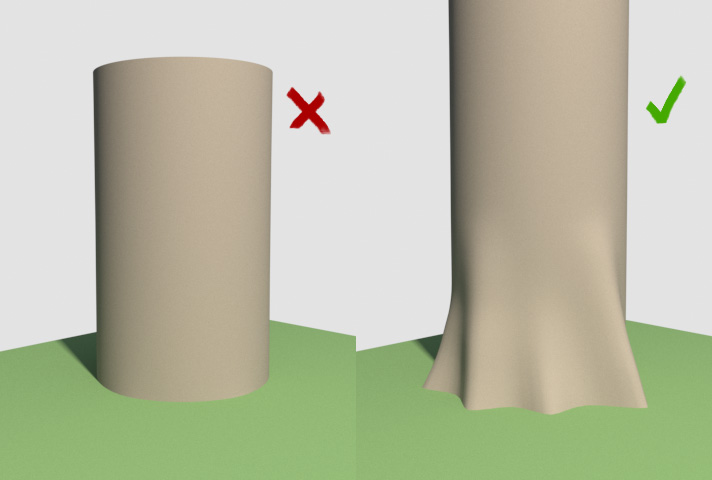
7) Add Roots Around Base
Remember, a tree is never just a cylinder stuck into the
ground. Trees have roots. So make sure that at the base of your tree
you have the beginnings of a root system. You don't have to create all
of the roots, but make sure to indicate them.
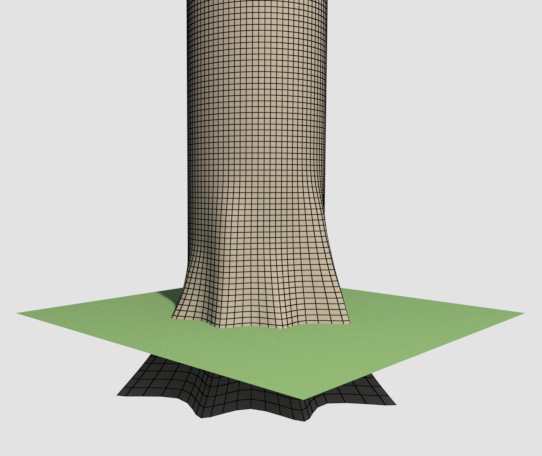
8) Build An Extra Foot Below
Ground
Make sure you don't end your tree exactly at the ground,
build an extra foot or two underground. That way you can move the tree
up and down slightly in the ground
without worrying about the tree accidentally floating above
the ground. You want the tree to always interpentrate with the ground
plane.
Conclusion
Hope these tips add some extra life to your next tree.