Ptex Use In Mudbox
By Neil Blevins
Created On: Apr 14th 2012
Updated On: Dec 6th 2024
Software: Mudbox
Go here
to read this tutorial in Russian.
First, please read the more general Ptex
tutorial to learn about the Ptex format. Once you've done so, this
tutorial discusses using Ptex with mudbox. Mudbox 2012 had Ptex
support, but full Ptex support comes with mudbox 2013, so this tutorial
assumes you're using mudbox 2013.
To paint using Ptex, you first need a 3d application, a renderer and a
3d paint
program that all support Ptex.
- 3d software like 3dsmax using Mankua's Stripes
plugin will allow you to assign Ptex files to your objects.
- Prman and Mentalray 3.10 standalone will render Ptex
files. Vray also reads Ptex files.
- 3d Paint apps like Mudbox and Mari
support Ptex.
Setup Ptex In Mudbox
To paint on your model using Ptex, you need to follow these steps...
- Select your mesh in mudbox
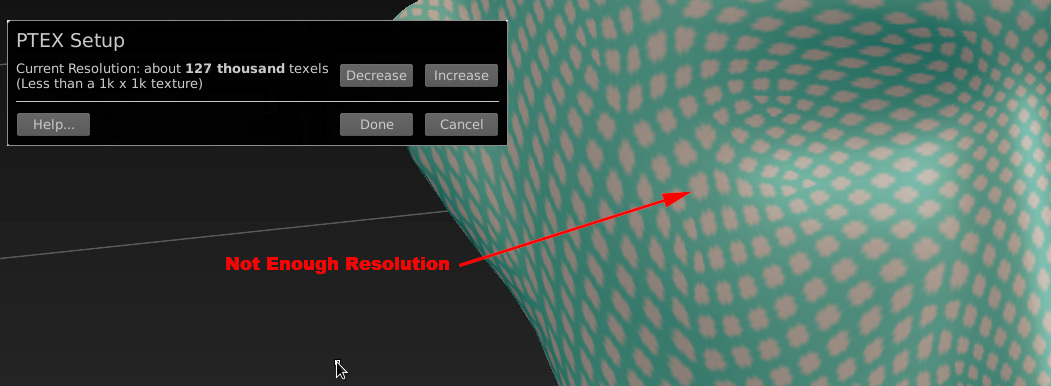
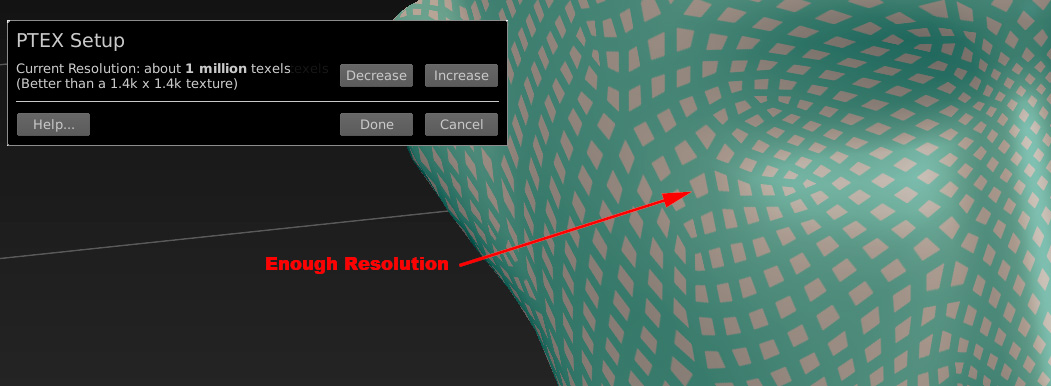
- Go to Mesh -> Ptex Setup. This will let you increase or
decrease the size of your Ptex files on the mesh (more texels means
more resolution). Watch the preview on your mesh, and increase or
decrease the size of your Ptex file until the pattern on your mesh is
no longer blocky.
If you ever need to upres or downres your Ptex painting, just go back
into Mesh -> Ptex Setup, it will remember your current setting, and
let you modify the resolution. Remember, the more resolution, the
larger your Ptex file and the more RAM it takes up.
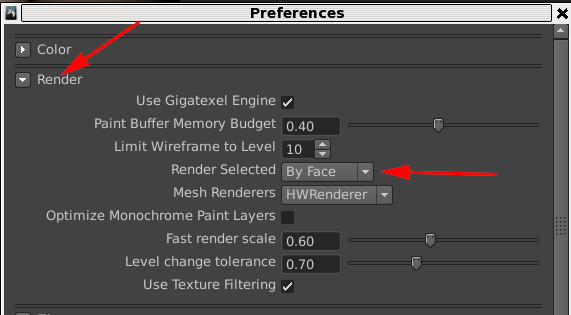
Adding More Resolution On A Per Face Basis
If you want to increase the resolution of just a part of your Ptex
file (like add a larger Ptex to just the forehead of a face)...
- Go to Windows -> Preferences -> Render -> Render
Selected By Face.
- Go to the "Select/Move Tools" tab, choose "Faces", then paint a
selection of faces on your mesh.
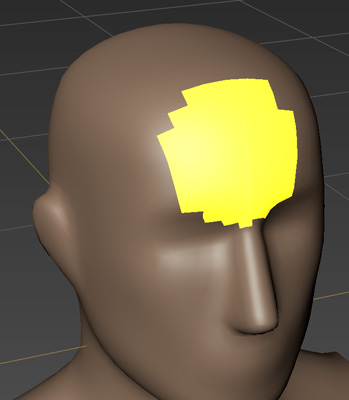
- Now go back into Mesh -> Ptex Setup, and increase or decrease
the resolution. These changes will only affect the selected area of
your mesh.
Saving A Ptex file With Your
Mudbox Scene
There are two ways to save out your paint as a Ptex file. First, you
can select a paint layer in the Paint Layer menu, right click and
choose "Export Selected". The second way will save a Ptex file when you
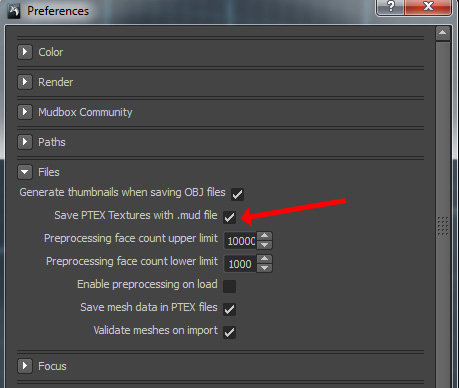
save your mudbox file (which is what I recommend). To do this, go to
Windows -> preferences -> Files -> Save Ptex Textures with
.mud file.
Now when you choose "Save" to save your .mud file, it will also save
the Ptex files in your scene. The only disadvantage of this technique
is file saving will now be slower, since it's saving your scene's Ptex
files every time you save your .mud file. If you don't want the speed
hit, then feel free to use the standard "Export Selected" feature.
Ptex Works With
Ngons in Mudbox
2013
New to mudbox 2013 is ngon support. In 2012, you could only paint to
Ptex on meshes where all of its faces were 4 sided. Now you can paint
on a mesh that contains tris, 5 sided faces, whatever.
Baking Your Ptex to UVs
One of the major advantages of Ptex is you don't need to set up UVS on
your mesh. But what happens if for some reason you suddenly need a UV
version of your paint? Like maybe someone needs your mesh for a game
engine, and their game engine doesn't support Ptex. You can bake your
Ptex into standard bitmaps using UVs. Here's the workflow...
1) Load your original mesh which has Ptex assigned and has some paint.
2) Load your new mesh that has UVs.
3) Go to Maps -> Extract Texture Map -> New Operation
4) Choose "Transfer Paint Layers", the Target mesh is your uv mesh, and
the Source is your Ptex mesh.
5) Transfer, and now your Ptex paint has been baked to regular tif
files you can assign using the uvs on your new mesh.
Baking Your Ptex To A New Model
With Modified Faces
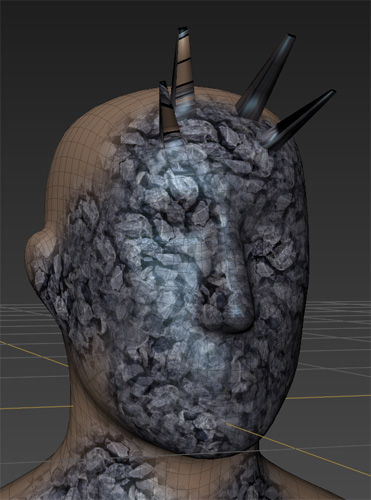
Lets say you take your mesh (say, for example, a human head) and paint
on it using Ptex. Then you have to make changes to your mesh, like
maybe adding some spikes to the forehead by extruding a face, and then
adding an extra span to the mesh. You can't just assign your Ptex file
to your new mesh, since the Ptex file is expecting a different mesh
with a different face count. But repainting the face would be time
consuming. So you need to bake the paint from the original Ptex mesh to
the new mesh. You do this in a similar fashion to baking to UVs.
1) Load your original mesh which has Ptex assigned and has some paint.
2) Load your new modified mesh.
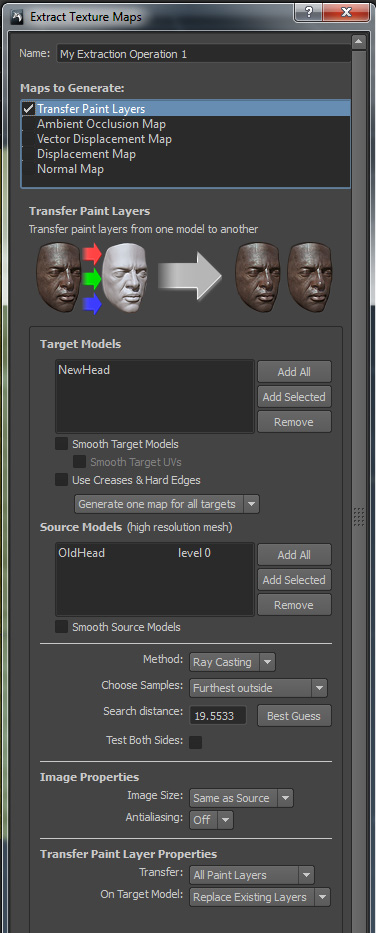
3) Go to Maps -> Extract Texture Map -> New Operation
4) Choose "Transfer Paint Layers", the Target mesh is your new modified
mesh, and the Source is your original mesh.
5) Transfer
6) Touch up any problems, like for example, since the original mesh
didn't have spikes coming out of its forehead, you'll need to paint
the spike with new paint. But parts of your mesh that didn't change
much should transfer over with a minimum of texture loss.
Baking Your Displacement To Ptex
If you've used mudbox to sculpt, you're used to extracting displacement
maps out of the software. See Converting
A Mudbox Model To 3DSMax as an example. Well, you can now bake
your displacement map to a Ptex file instead of a usual tif. This means
you can bake a displacement map without the need for your object to
have UVs. To do so, just bake like you normally would with Maps ->
Extract Texture Map -> New Operation -> Displacement Map or
Vector Displacement map, but instead of choosing a 2d format like tif
for your output file, choose Ptex.
Transferring Ptex Files
You can also now easily move Ptex files between applications, so say
you want to start painting your Ptex file in Mari, but then want to
move it over to Mudbox to do your final painting because Mudbox has
some features you want to use...
- Import your Ptex file directly into mudbox by going to File ->
Import (this will load the mesh and the paint inside the Ptex file)
- Or, say you have your mesh open in mudbox, and it already has a
few layers of paint, and you want to import a new paint layer from a
Ptex file, just select your object, go to your paint tab, and choose
"Import Layer".
- Or, say you have a Ptex paint layer in mudbox that you want to
transfer to Mari, just select the paint layer in the Paint Tab, right
click and choose "Export Selected" and save it as a Ptex file.
Using Ptex files in your 3d App
Once you've created a Ptex file inside mudbox, you can use it in a
number of 3d apps and renderers. Please consult the documentation of
the software you're importing to to see if it's ptex compatible, and if
so, how to import.
Conclusion
So that's just a few of the things you can do with Ptex files in
mudbox 2013. Hopefully that gives you some practical examples of how to
use Ptex files in mudbox, and the sorts of manipulations you can
perform on them.
This site is ©2026 by Neil Blevins, All rights
are reserved.
To see hundreds of other tutorials similar to this one, visit the
Neil Blevins Education Site