Camera Basics By Neil Blevins Created On: Oct 13th 2025 Updated On: May 7th 2026 Software: Any
If you're a traditional or digital photographer, then terms like
Aperture, ISO, or Worms Eye view are your bread and butter, you likely
know all about them. But for 3D Artists, these terms may be brand new
and somewhat mystifying, yet understanding these terms can be so
important to using cameras effectively in your 3d software. This
tutorial is here to teach the basics of these traditional terms to 3D
artists, and hopefully 2D artists who are interested in creating more
photographic paintings and people with an interest in pure photography
will find it helpful as well.
You have two choices with this lesson, watch the video below, or
read the full text.
Real World Camera Settings &
Terms
First off, old cameras used real film to take photographs. Film was
replaced in digital cameras with an image sensor. However, regardless
of whether it's traditional film or digital, the same terms and
settings generally apply to both methods.
Here's the most important settings or controls on your
camera that you can directly modify...
Aperture (f-stop)
Focus Distance (m)
Shutter Speed (seconds)
Film Speed (ISO)
Focal Length (mm)
Now lets go more indepth into these settings and other terms you'll
need to know...
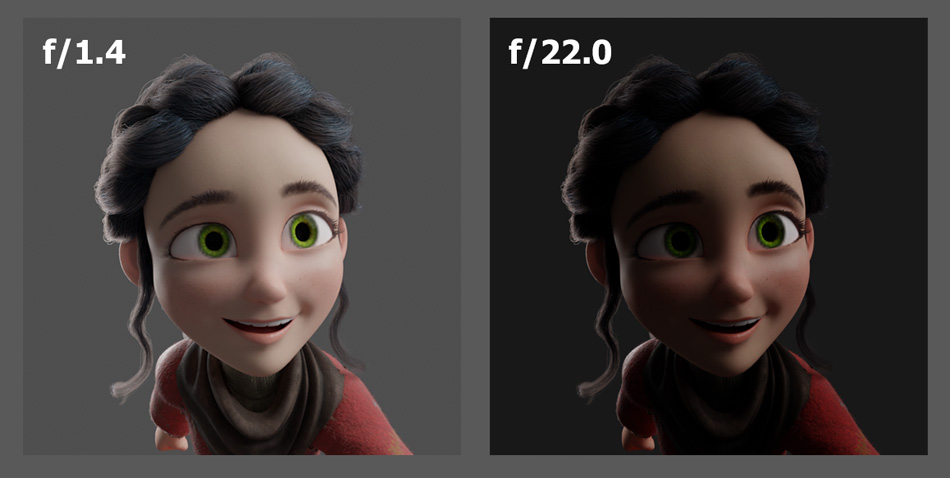
Aperture: The Aperture
is the opening that lets light into the camera. Measured in f-stop
(focal ratio). The larger the opening, the smaller the f-stop, the more
light comes in. The larger the f-stop, the smaller the opening and the
less light gets in. F-stop of f/1.2-2.8 is big opening, f/4-8 is medium
opening, f/11-32 is a tiny opening.
F-stop: The value used
to define the size of the Aperture.
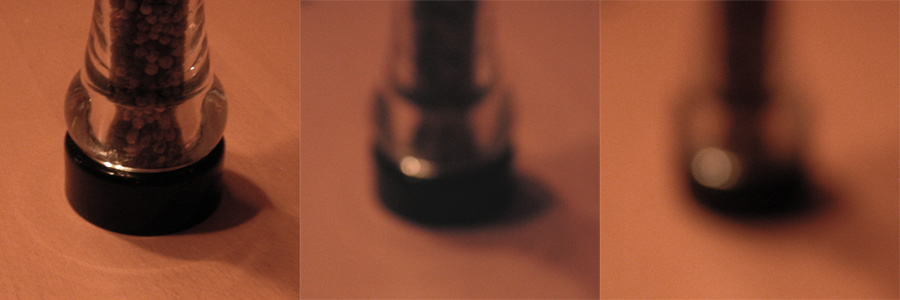
Focus: an object that
appears Clear in your photo, as opposed to "Out Of Focus" which means
the object is blurry.
Focus Distance: The
distance between your camera and the object that's most in focus.
Usually measured in feet or meters.
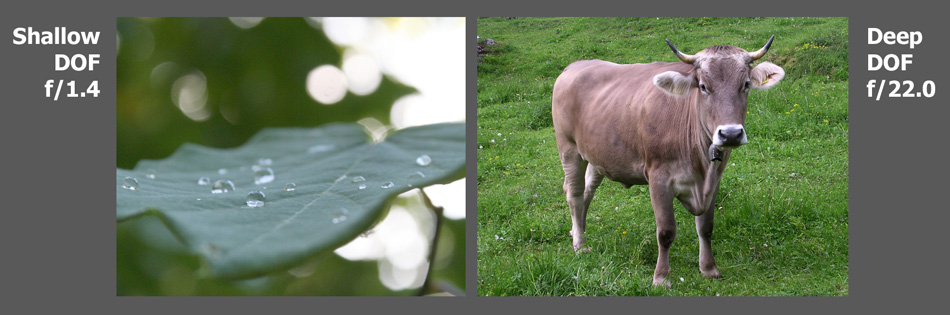
Depth Of Field (DOF): The
distance between the nearest and farthest object that's in focus. A
large f-stop value (smaller hole) makes most objects in focus in your
photo (Deep Focus). A small
f-stop value (larger hole) makes more objects out of focus (Shallow
Focus).
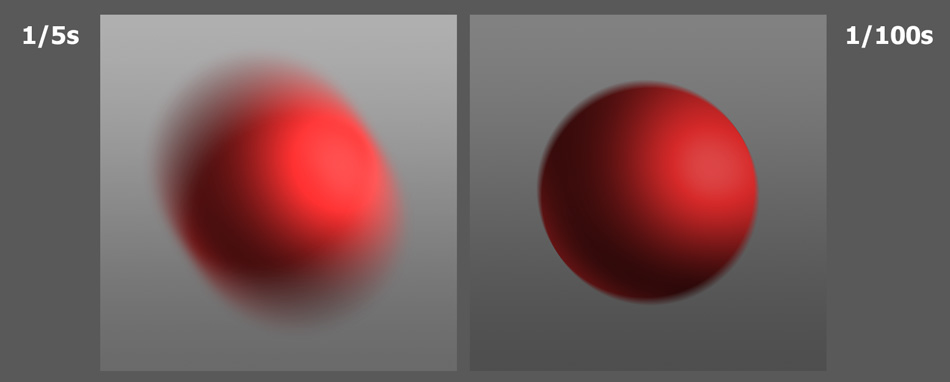
Shutter Speed: How long
the Aperture remains open to collect light. Measured in a fraction of a
second like 1/30s. Faster shutter speeds
collect less light than longer shutter speeds. Slow shutter speeds you
may need a tripod to keep the camera steady otherwise the image might
be blurry.
Motionblur: The amount
of directional blur an object has when it's moving. Higher shutter
speed = less motionblur, lower shutter speed = more motionblur
Film Grain: How noisy
your image is.
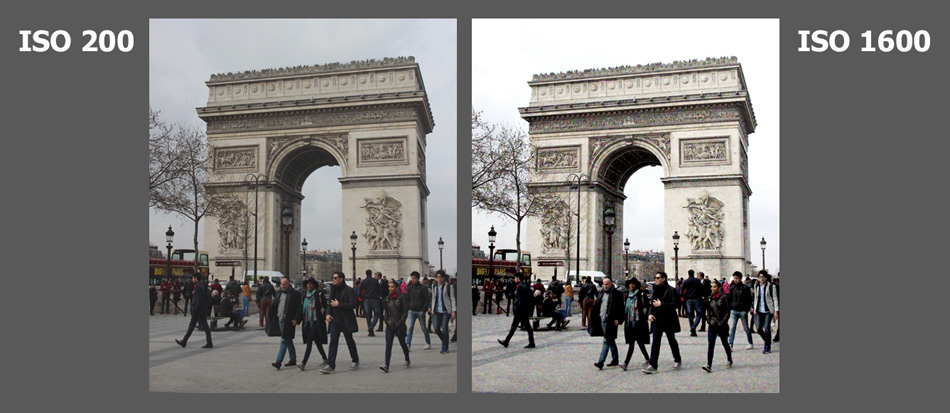
Film Speed: How
sensitive your camera is to light. Measured in ISO. Lower speed (say
ISO 200) produces a darker result, higher speed (say ISO 800) produces
a brighter result. Low speed creates less contrast, less grain and more
accurate
colors. High speed creates a higher contrast final image, more grain
and less
accurate colors.
ISO: The value used
to define the Film Speed.
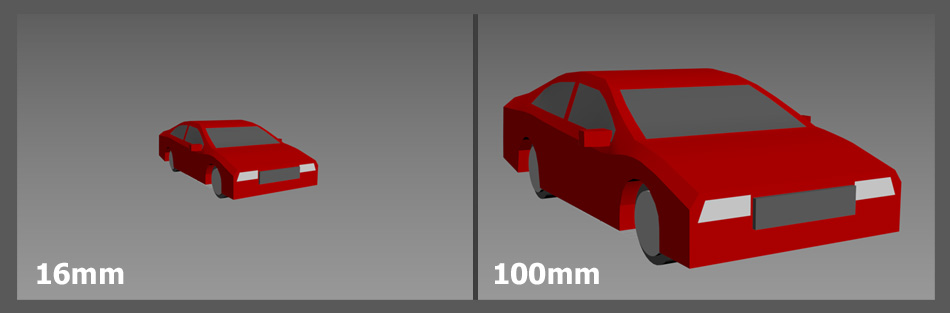
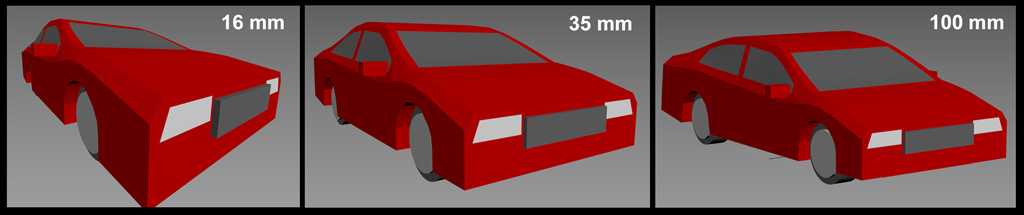
Focal Length: How zoomed
in the image is. Measured in mm. A low mm (say 16mm) is a wide angle
lens
and you appear to be further from your subject. A high mm (say 100mm)
is a telephoto lens and you appear much closer to your subject. You can
change your focal length by swapping your lens, or using a zoom lens
that lets you change the focal length gradually between a min and max
value.
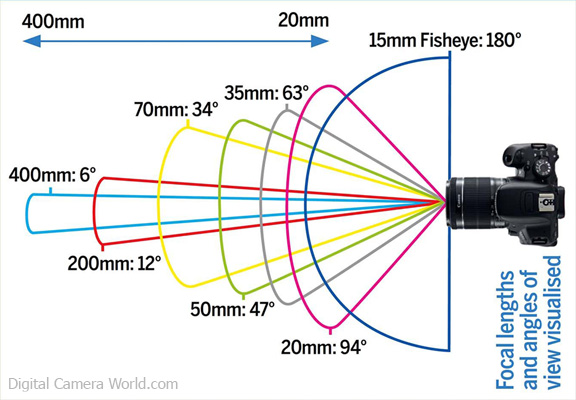
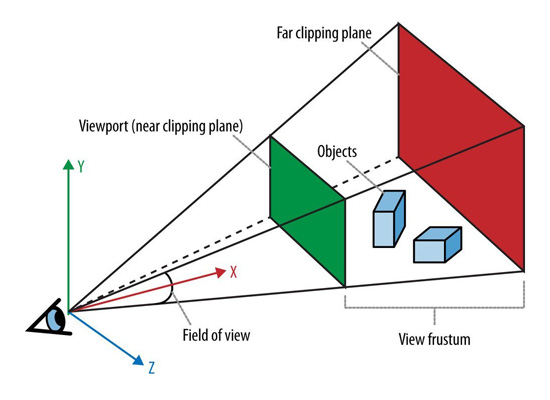
Field Of View (FOV angle):
How much of the scene you see, related to the Focal Length. A low focal
length means a much larger field of view, and vice versa. Measured in
degrees. Different types of cameras have a different ratio between the
Focal Length and the FOV.
Finally, Exposure isn't something you usually control directly, but the
exposure of your image is usually based on your choice of Shutter
Speed, Aperture and ISO.
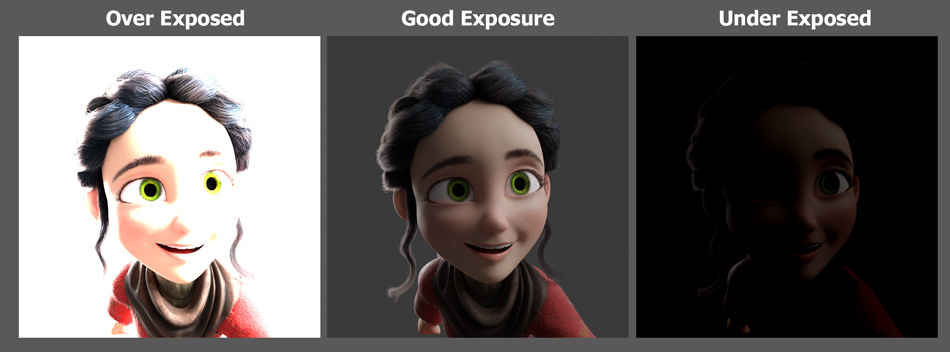
Exposure: The amount of
light per unit area reaching a frame of photographic film or the
surface of an electronic image sensor.
Over Exposed: When
there's too much light in your environment for your camera settings and
so your final photo is too bright.
Under Exposed: When there
isn't enough light in your environment for your camera settings and
your final photo is too dark.
How Do They Relate To Each Other?
All of these settings relate to each other in a complex way. If you
change one of them, you may need to reduce or increase others to get
the image you expect or want. Here's some more info on how they
relate...
Bright Environment (Sunny Day):
You need to collect less light to take your picture, because the
environment is already very bright
Small Aperture (ex: f/32)
DOF: more objects in focus
Use High Shutter Speed (ex: 1/96 sec) to capture less light, this
will cause less motionblur
Use Low Speed Film to capture less light, this will cause less
Grain, less Contrast, and more Accurate Colors
Dark Environment (Night Time):
You need to collect more light to take your picture, because the
environment is very dark
Large Aperture (ex: f/2.8)
DOF: less subjects in Focus
Use Slow Shutter Speed (ex: 1/24 sec) to capture more light, this
will cause more motionblur
Use High Speed Film to capture more light, this will cause more
Grain, more Contrast, and less Accurate Colors
And here's some common situations you might be in and how to
fix them based on these relationships.
If your photo is too light (Over Exposed):
it can be darkened using a
smaller aperture (larger f-stop).
increase your shutter speed, it
will darken things down.
it can be darkened using a
lower ISO, and your image will have less grain.
If your photo too dark (Under Exposed):
it can be brightened using a
larger aperture (smaller f-stop).
decrease your shutter speed, it will brighten things up but it
might be blurry because you're jiggling the camera.
it can be brightened using a
higher ISO, but the image will be more Grainy.
DOF causes your object to be too out of focus, increase f-stop,
this will cause the image to be darker, so increase the ISO or decrease
shutter speed.
DOF causes too much of your scene to be in focus, decrease fstop,
this
will cause the image to be brighter, so decrease the ISO or increase
shutter speed.
Your object is moving fast (like a soccer player, a moving car,
or a running animal), a lower shutter speed will avoid too much
motionblur.
Use a high ISO film to get more brightness since the low shutter speed
reduces the light your camera collects.
Camera Positions
The placement of your camera and what you're pointed at will also
heavily affect your final photo. Here's some common photographic camera
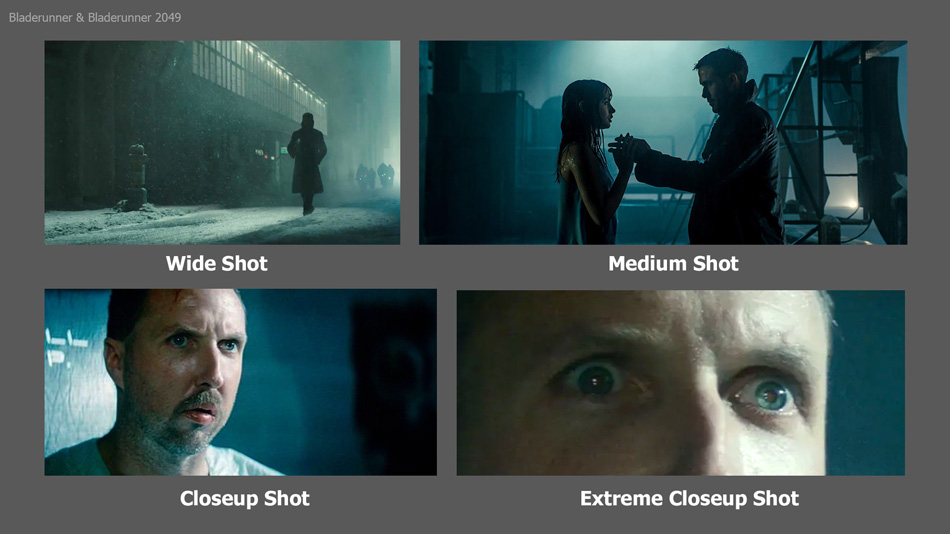
placement terms: Wide Shot: Sometimes
called Establishing Shot. Your are
further away from your subject, and see more of the environment. If
there's a person in your scene, you can probably see all of them from
head to toe. This is used to give the audience an idea on what the
environment looks like, and where the subject is in that environment.
Medium Shot: Half way
between a close and wide shot, if a person is in the picture, you
likely see them from waist up. Usually used when the actors are moving
their bodies, and you want to see their faces at the same time.
Closeup Shot: You're very
close to your subject, if a person, you see probably just their face.
This when you don't need to see any body movement, you just want to see
them talking or their expressions and emotion.
Extreme Closeup Shot: even
closer than close up, you may just see their eyes. Usually used to see
into the mind of the subject, what are they thinking?
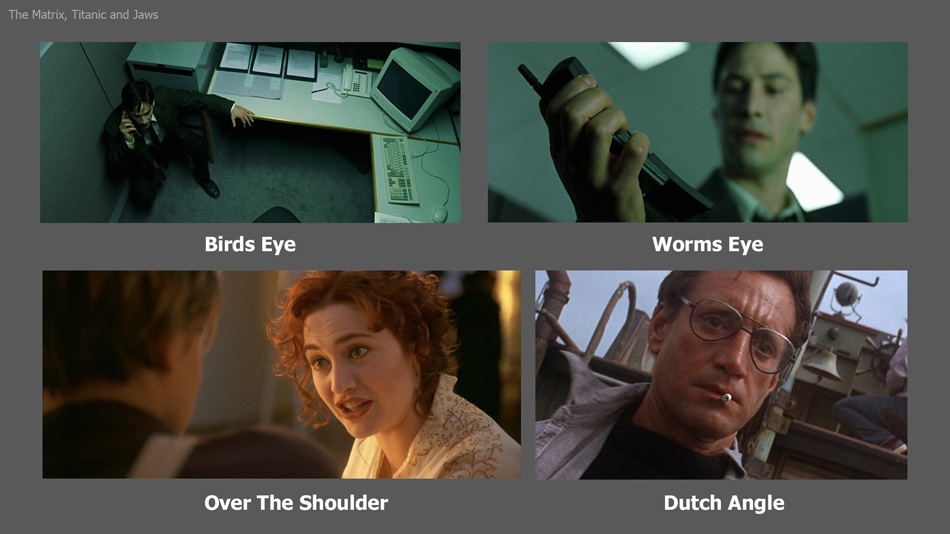
Worms Eye View: The
camera is low and you are looking up at your subject. Makes the subject
look dominant.
Birds Eye View: The
camera is above your subject and you are looking down. Makes the
subject look inferior.
Over The Shoulder Shot:
Looking over the shoulder of one character facing another character
who's talking. Good for conversation.
Dutch Angle: A shot where
the camera is slightly tilted. This feels a little off, used frequently
to show something is wrong in the story.
Optical Effects
When using a camera, there are some special optical
effects that can occur due to the way the camera lens interacts with
the light in your scene. Sometimes you might want these effects,
sometimes you don't, but regardless it's good to know about them.
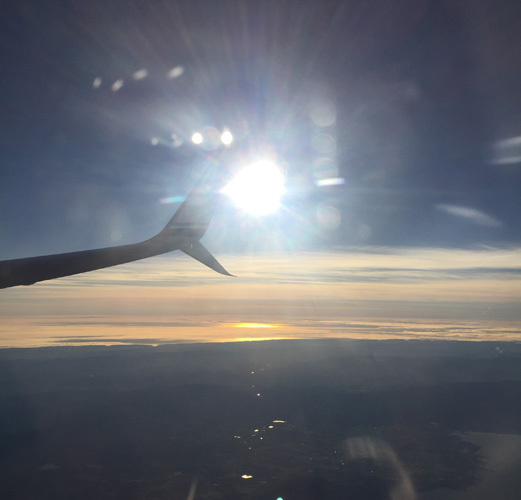
Lens Flare: When something in
your photo gets really bright (like the sun), you can see a flare occur
that appears as a bright star with secondary circles.
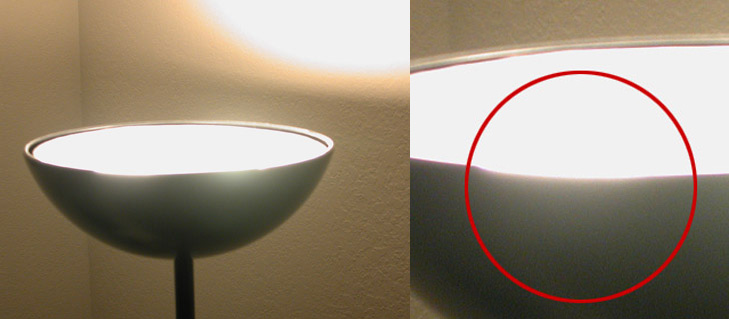
Bloom / Glare: A soft glow in your photograph called a Specular Bloom that
appears in the
brightest spots of your photo. Consider this a mild Lens Flare.
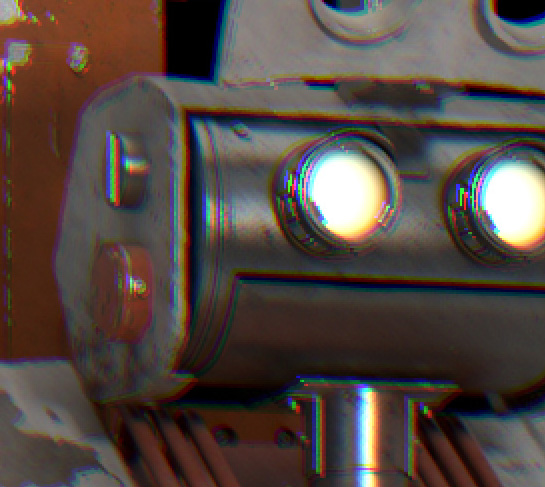
Chromatic Aberration: Different
wavelengths of light separate in a lens causing you to see a prism
effect around the edges of objects.
Bokeh:Small Circles of light
that appear when some part of your photo is
bright and really out of focus.
3D Software Camera Settings
Finally, when using 3d Software like Blender or 3dsmax,
there are some common camera settings that have no real world
equivalent that you should know about.
Clipping Planes: These planes
allow you to ignore (make invisible) objects that are too close to the
camera, or too far away from the camera. Can be useful to optimize the
amount of stuff visible in a scene, or to do cutaway renders.
If your goal when painting in 2d or rendering in 3d is realism, some or
all of these camera effects can be added to increase that reality. Or
removed to get a more stylized look.
Hopefully this helps explain some of these terms and how they interact
to create your final image.