Weathering: How To Make A Dirt Brush
By Neil Blevins
Created On: July 20th 2025
Updated On: Nov 28th 2025
Software: Photoshop or Procreate
A quick little tutorial showing how I make Dirt Brushes inside
photoshop and procreate to use either to paint dirt and grime in a 2d
painting, or on
textures to be applied to 3d objects.
For more on the subject of using a dirt brush, check out Painting Dirt.
Photoshop Example
Here's how to make a dirt brush in photoshop.
Here's some notes:
- Take a photo of a dirty material (flat surfaces are the best).
- Make a square selection and crop
- Image - Adjustments - Desaturate
- Using an existing brush, paint away white parts too close to the
edge, to create something that's vaguely circular, but has an uneven
edge.
- Image - Levels, clamp the color so there's only black or white
with very little grey
- Using an existing brush, paint away some dirt to make it an
even more uneven edge.
- Select All
- Edit - Define Brush Preset, give it a name
- Add randomness to the brush, click the brush in the brush panel,
turn on shape dynamics, turn up size jitter, angle jitter higher
- Turn on scattering, and increase it a little bit
- Go into brush tip shape, and increase spacing so there's more
space in between each brush stamp
- in the brush palette, click create new brush, give it the final
name, now you have a new brush with all of your settings changed.
Procreate Example
Here's how to make a dirt brush in procreate.
Here's some notes:
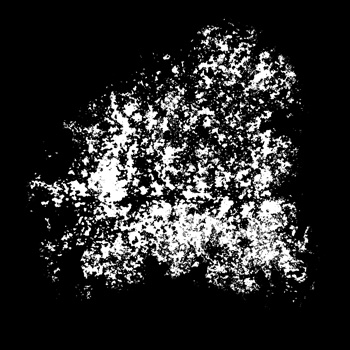
1) Take a photo of a dirty material (flat surfaces are the best). For
example, a photo like this:

From the Procreate gallery, click "Photo" and choose the photograph
you've just taken.
2) Make it Black and White with Adjustments - Hue, Saturation,
Brightness. Turn Saturation to 0%.
3) Give it more contrast using Adjustments - Curves, and in Gamma mode
make it almost purely black and white.
4) In this case, since we want the
dirty part to be white and the background to be black, switch the
position of the curve so the dot on the left moves to the right of the
dot on the right.
5) Crop the image to a square by going to Actions - Canvas - Crop &
Resize.
6) Using an existing brush, paint away white parts too close to the
edge, to create something that's vaguely circular, but has an uneven
edge.
7) Now you have your brush shape, send it back to the photos on your
ipad by going to gallery, Select, select your canvas, clicking Share,
Png, "Save Image". This will save this image to your ipad's photo
library.
8) Open a fresh canvas, go to the Brush tool, click it twice, and hit
the + icon and say "Create New Brush"
9) Go to Shape - Shape Source and hit the edit button
10) Import - import a photo, and import the brush shape you saved to
your ipad's photo gallery
11) Under Shape properties, Increase Scatter value, this will rotate
each part of your brush randomly as you paint
12) Turn on Flip X and Flip Y for more randomness
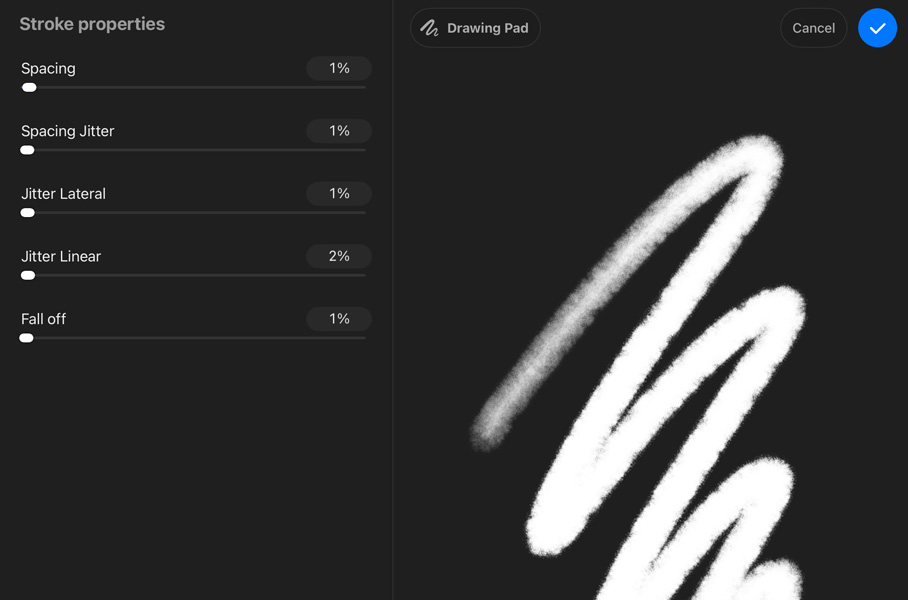
13) Under Stroke Path, increase spacing higher, you can also turn
jitter Lateral and Jitter Linear up a little bit.

Exercise
If you really want to drive the point home, it's time to make your own
brush! Go outside and take a photo of dirt and then make yourself a
dirt brush for your own use using the techniques above in your favorite
2d painting app.
This site is ©2026 by Neil Blevins, All rights
are reserved.
To see hundreds of other tutorials similar to this one, visit the
Neil Blevins Education Site